Wife, mother of two, daughter, sister, friend. Lover of food, travel and event planning. I have a strong desire to get everyone I know to stop eating processed sugar and learn to love healthier foods!
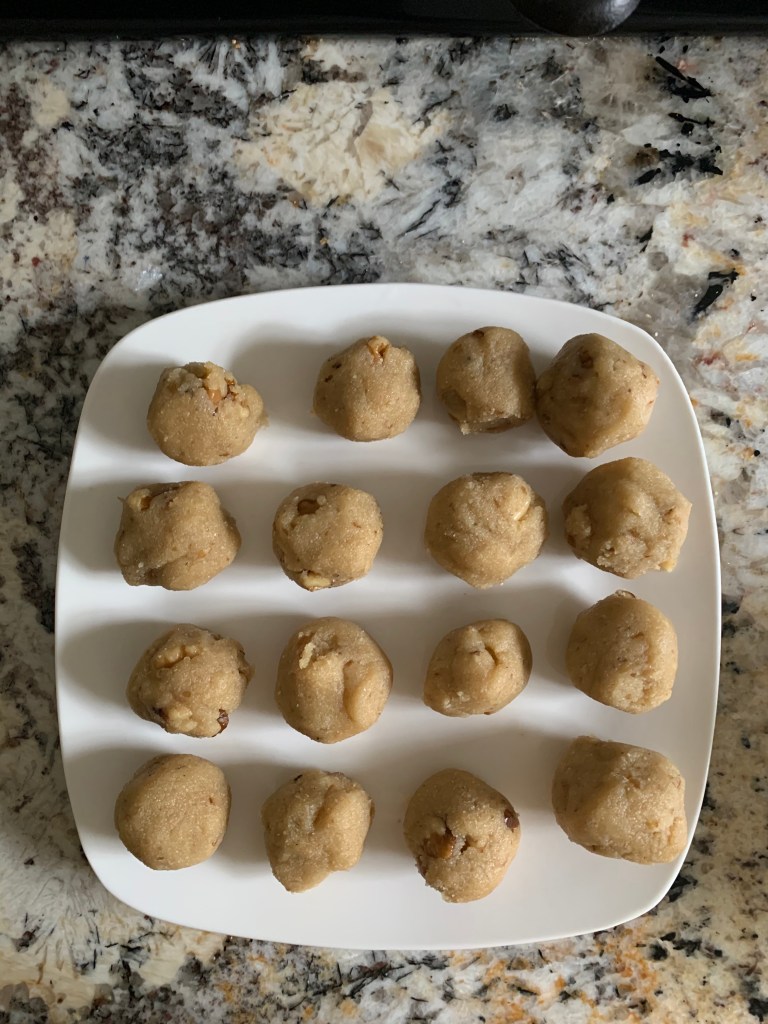
In my younger years… let me tell you, I could eat some cookie dough. As often as humanly possible. Make that any kind of dough or batter really… brownie batter? YES! Cake batter? YES! Icing from the bowl? Strong YES. Taking away refined sugar and grains really put a damper on things but I’ve become more and more creative. Such as using garbonzo beans in my now famous cookie recipe ;). I’m also a huge fan of maple syrup or honey in place of white sugar. I’m well aware that both of those have lots of sugar but they are gifts from mother nature and should be treated as such! Full of vitamins, minerals and antioxidants. I have tried the weird sugar alcohol substitutes such as erythritol and other things I can’t pronounce and I am just not into them. They are unappetizing at best and honestly I’d rather just not have something sweet, than eat something with that in it. Generally speaking I don’t eat many sweets but when I do … I use maple syrup or honey. Even when making one of my absolute favorites, pecan pie!!!!! Ok, back to the balls. These are GOOD. Sinful even. To be honest, I probably won’t make them again for a long time because I legit wanted to eat the entire bowl in one sitting. After letting my kids try one they finished them off for me ;). The ingredients are so super simple and I can see the potential for lots of add-ins if anyone wanted to experiment. I have always been a super weird person and prefer my chocolate chip cookies sans the chocolate chips. I would fully prefer chopped walnuts or pecans. I can see if you like chocolate chips though these would be so great with mini chocolate chips or maybe even rolled in sprinkles for a fun treat for your kids. I would not call these a ‘healthy snack’ by any means but absolutely a healthy alternative to a regular cookie. Full of protein, some fiber, vitamins, minerals, and antioxidants… so its a win!
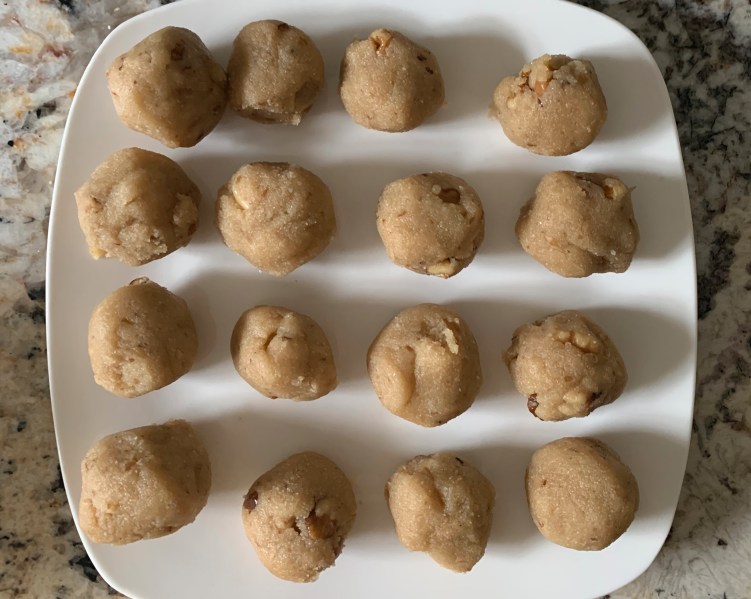
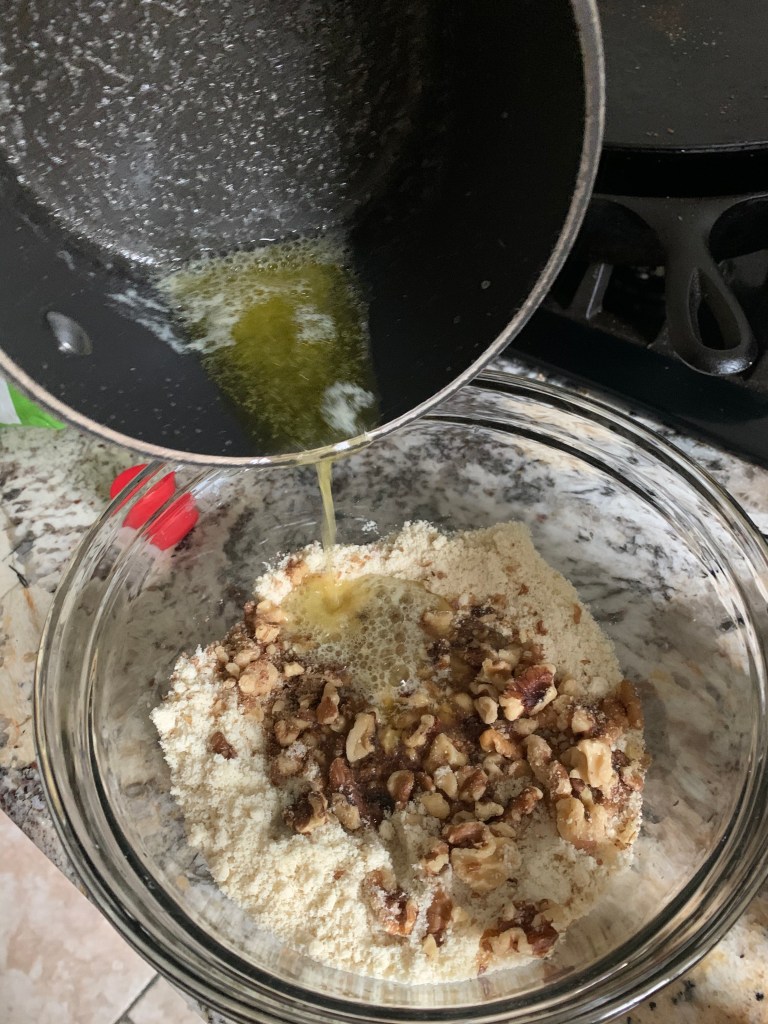
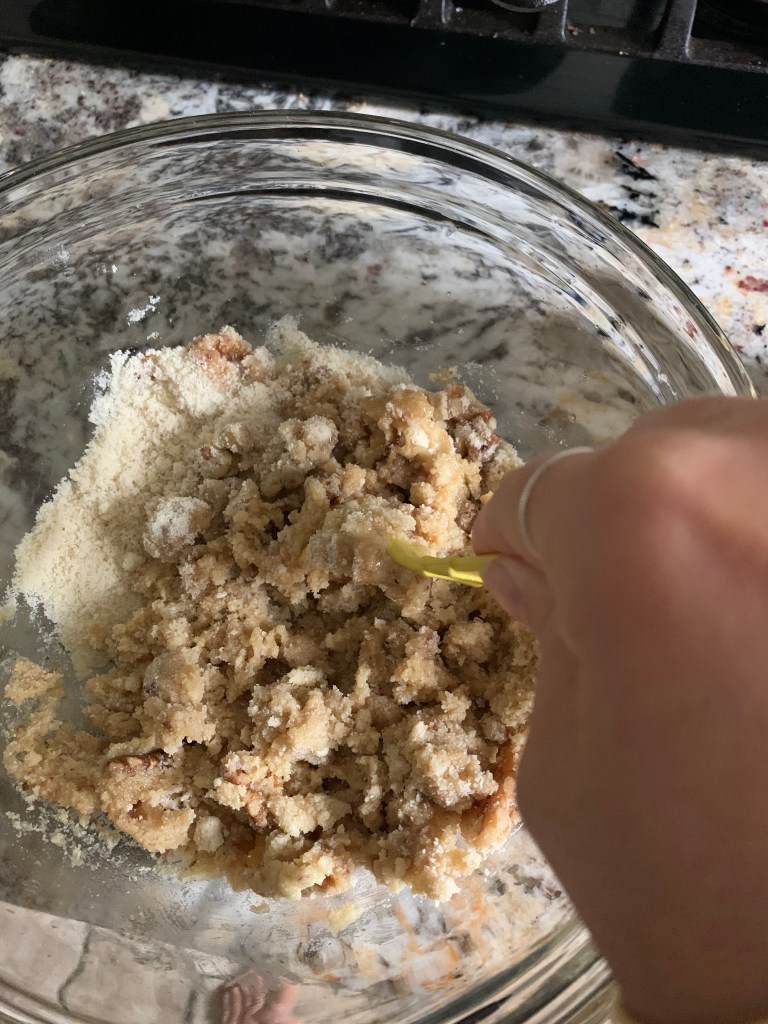
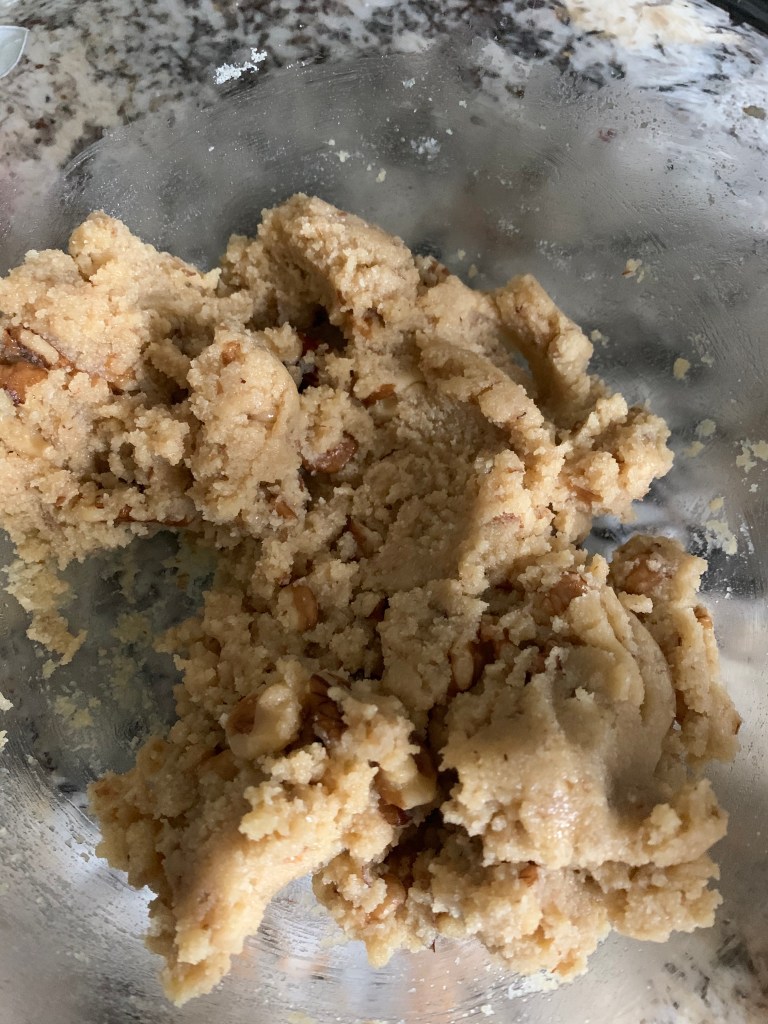
In a medium sized mixing bowl add flour, vanilla, sea salt, maple syrup and any add-ins you might be using, I used 1/2 cup chopped walnuts for this batch. In a small sauce pan melt the butter over medium high heat stirring frequently until it is light brown and fragrant like hazelnuts and heaven. You can just melt the butter and not brown it but I have to say it takes the balls up about 100 notches if you use the browned butter. Once the butter is ready add to the mixing bowl and mix well. Roll into several gumball sized sized balls using your hands. Arrange on a plate and put in freezer until cold. Than transfer to a storage container and keep in fridge. Makes about 16 balls.
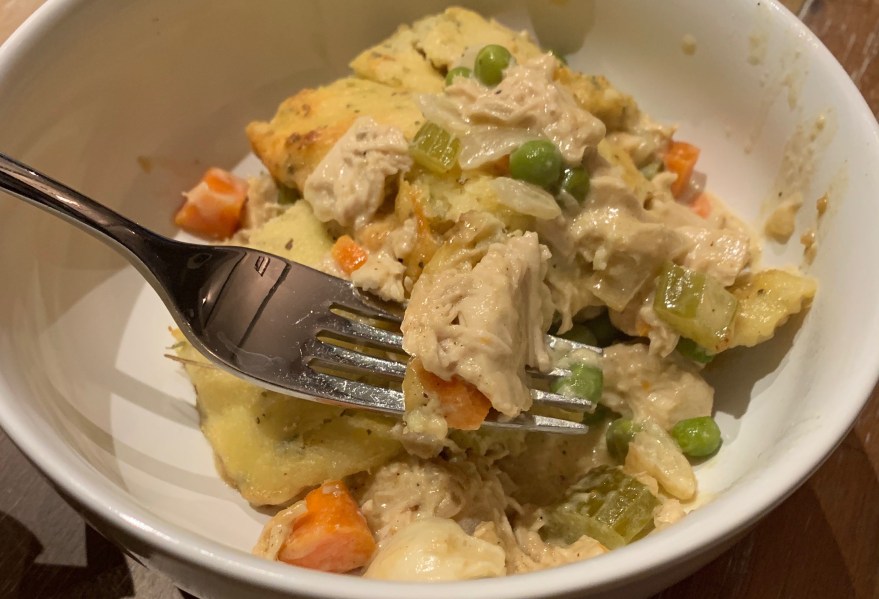
Today’s recipe was a recent experiment of mine that had been long in the making. I never was a fan of chicken pot pie growing up or chicken and dumplings or anything along those lines. Mostly because when I was young I liked zero vegetables. So the thought of all those peas and carrots was not appealing. Fast forward many years later and I can’t say it sounded that much more appealing, ha! BUT I randomly bought a small one at a local coffee shop for my young son one day. I split it with him and OMG it was so so so so so so so good. So…filling and comforting…comfort food yea?! So the place QUIT selling it which was super lame AND I quit eating grains. So for a long time now I’ve had it in the back of my head that I want to try playing with a grain free version. Last night, it finally happened! My husband is not on board with this kind of food in general so when he asked what I was making I told him it was a surprise :). Happy to report he LOVED it! I think I still might play with this recipe a little more, maybe adding some more variety vegetable wise and MAYBE doubling the recipe for the topping but I have to tell you it was really really really good just as it is below. If you DO eat grains and want to simplify the recipe just buy one of those roll out pie crusts and put over the top instead of the topping recipe below. Although, grain free or not the topping I used is AWESOME!
For the filling:
3 T butter
1/2 cup diced onion
1/2 cup celery diced
1/2 cup carrots diced
3 cloves garlic minced
salt and pepper
2 cooked chicken breasts – diced or shredded
3/4 cup heavy cream
1/2 chicken broth
2 T dijon mustard
3/4 cup shredded white cheddar
1/2 cup frozen peas
For the topping:
1 1/2 cup shredded mozzarella cheese
3 T cream cheese
3/4 cup almond flour
1 large egg
1 t garlic powder
1 t onion powder
1 t Italian seasoning
salt and pepper
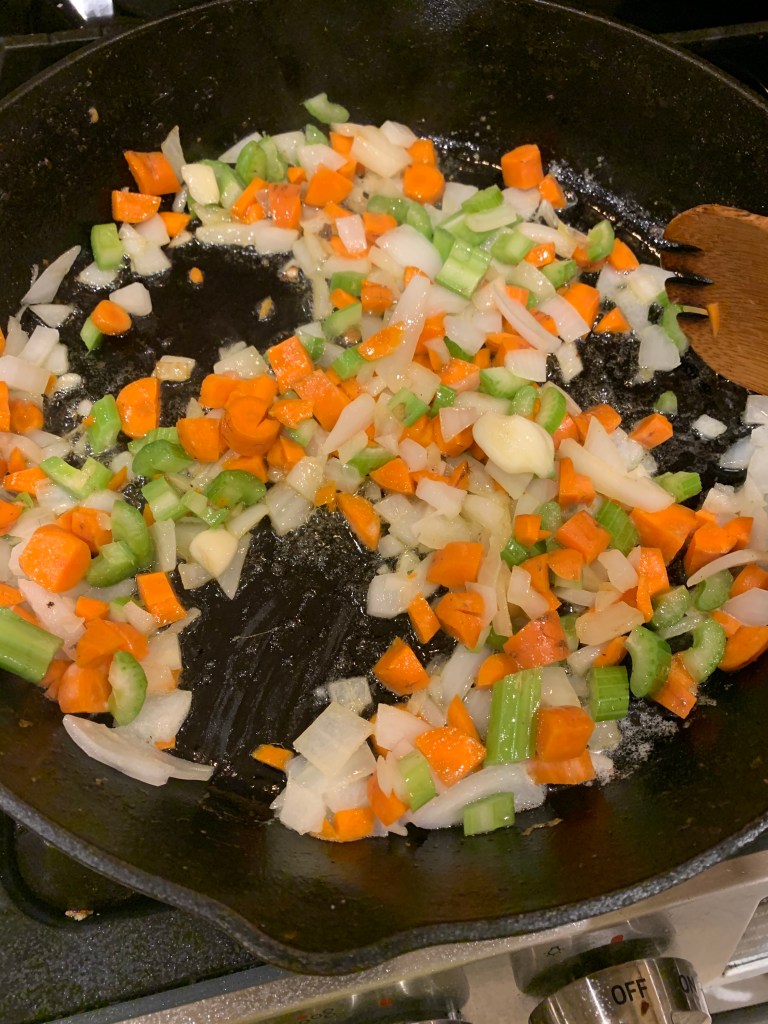
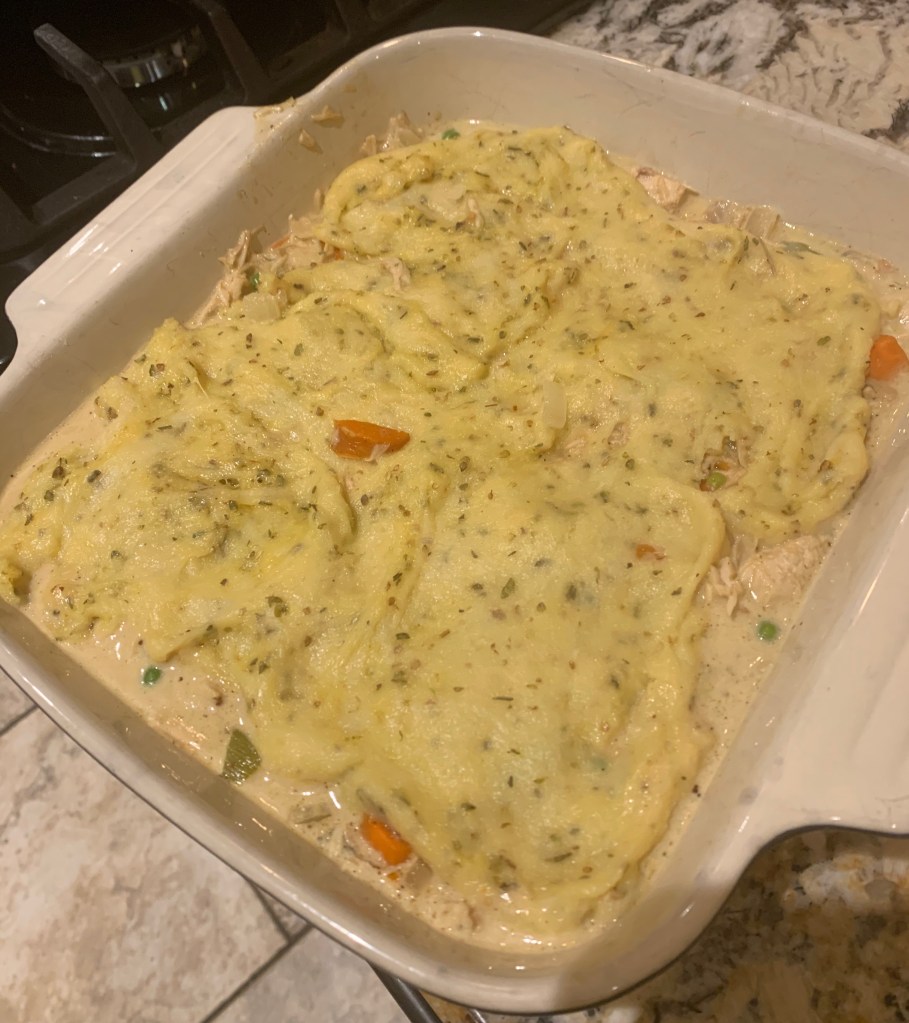
Heat the butter in a large skillet over medium heat. Once butter is melted add in onion, carrots, celery and garlic and a little salt and pepper. Saute until veggies are soft. Add in the cooked chicken, heavy cream, dijon and broth. Bring to a boil over medium heat and than reduce heat to low and simmer around 5 minutes. Now add in the cheese and peas. Mix well and spoon into a 9×9 baking dish or pie dish.
For the topping – put the shredded mozzarella, cream cheese and almond flour in a glass mixing bowl. Microwave for one minute, take out and mix and than microwave for one more minute. Next mix in spices and egg and mix really well. This is really best done with your hands or maybe a wooden spoon. It is ready to shape and place on top of filling! I used a cutting board to kind of press into the shape I needed it to be for the square dish I was using. So put it onto a cutting board or a plate and use your fingers and try to press it out to the size and shape as the dish. You could even do this in small pieces and connect them together. Once you have pressed out put large piece or pieces on top of filling. Its harder than it sounds I promise! As long as its well mixed its pretty easy to work with. Once its arranged on top bake for 25 minutes at 375
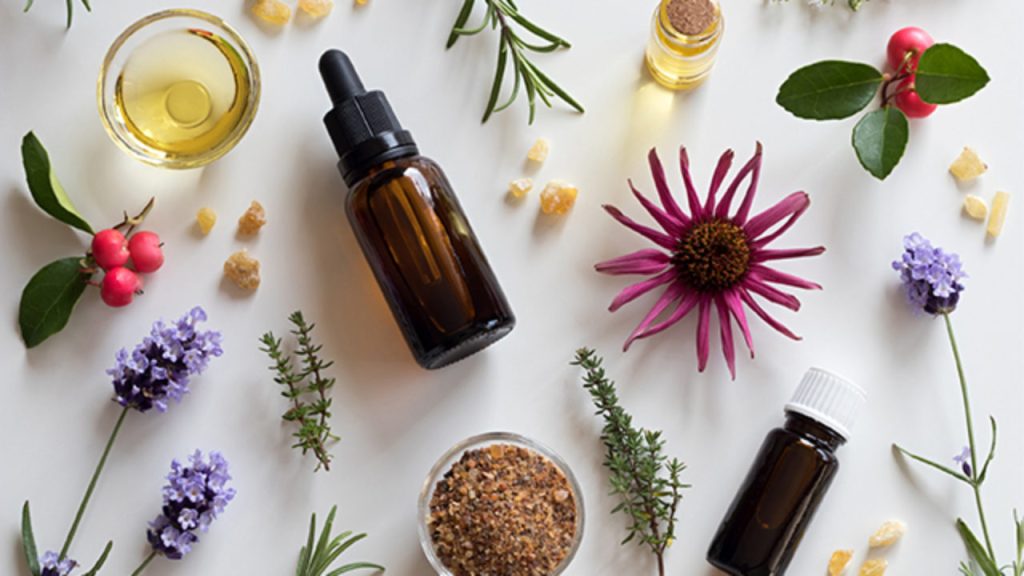
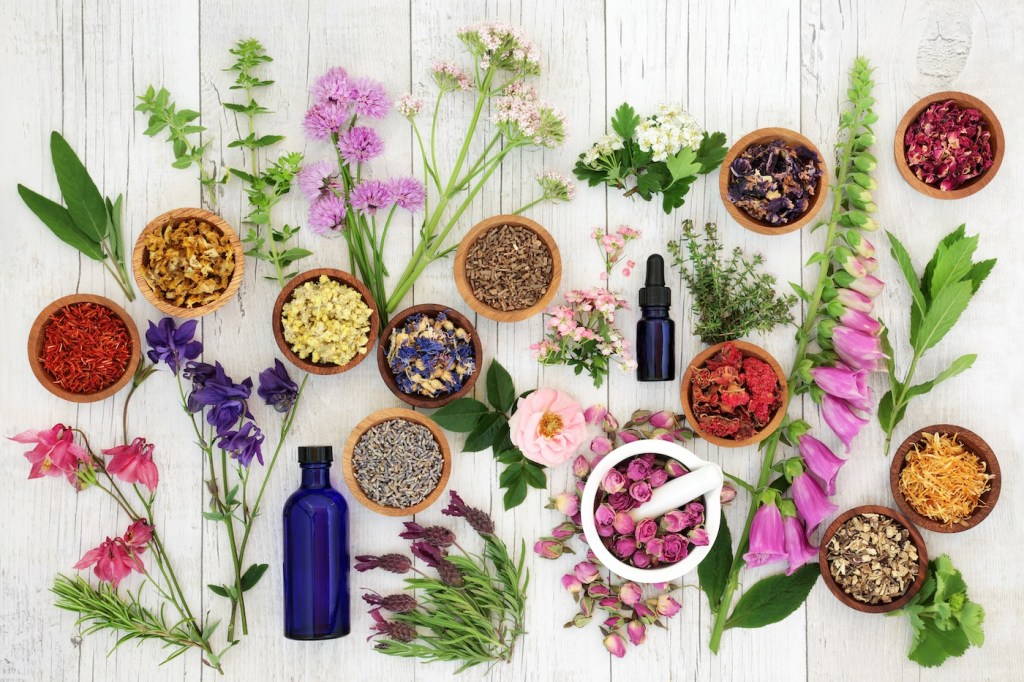
This is probably going to be a pretty long post because this is a serious passion of mine ;). I have real, deep, never ending love and gratitude for essential oils. My oil drawer is overflowing and my oil cabinet is almost too full to close. I love them all and I use every. single. one.!! I have an oil or oil blend for stress, anxiety, sleep, headaches, bug bites, wounds, bug repellent, muscle soreness, immune system, sinus congestion, acne, motion sickness, stomach issues. I have something to uplift you or calm you or basically whatever you need whenever you need it! I know a lot of oil skeptics and to them I say… wellllll at least they smell good right? If you aren’t a believer or at least interested in being a believer there is not a whole lot i can do for you, ha! I’m obviously not a scientist or doctor so I won’t go into WHY they work and try to make you a believer but for ME, I know they work. My evidence is….anecdotal. If I feel overwhelmed or super stressed out and I diffuse some lavender I INSTANTLY feel calmed down. If I’m feeling tired or worn down and I diffuse wild orange and lime I INSTANTLY I feel more energetic and happy. Another huge one for me is peppermint oil. I’ve had headaches most of my life and peppermint oil has helped immensely.
My first brush with oils was probably in 2003. I had anotherrrrr super bad cold and someone happened to tell me about oil of oregano and how it was a miracle worker and promised that “you will never be sick again”. (Check out some info on oregano benefits here.) I promptly went to our local health food store and picked up a 1 oz bottle for $30(!!!!!!) and it was true… from then on I was pretty much never sick again. Until 2012 when I had to quit taking it due to pregnancy ( you cannot take it when pregnant or nursing). At the time essential oils or “EO’s” were not something I knew anything about and I didn’t realize this counted as one. So I wasn’t officially introduced to EO’s until 2012 when my mom started using them pretty religiously. She uses the Young Living brand and introduced me to this clove blend called Thieves that smells like autumn and warmth and all things soothing and I fell in LOVEEEEE!! She told me it was great for the immune system and had antimicrobial properties so putting on our lower backs or wrists/feet when we were feeling sick and diffusing became normal for me. She also brought a blend for my new baby boy (Gentle Baby) that smelled like heaven and would soothe him and calm him when he was fussy. She gave me a roller of it and I would rub it on his tiny feet and he seemed to be calmer and sleep better whenever I remembered to use it. Even then though… I still wasn’t quite tapped into the oil world yet and the never ending gifts it would eventually bring to me and my family. Fast forward maybe 4 years later. My sweet boy seemed to have a cold he could not kick so I hooked up with a local friend that is very knowledgeable about oils. She gave me a lot of good advice and helped him get better faster and more importantly STAY better. I loved all the ways oils could help my family and was seeing proof of how beneficial they were in our every day lives.
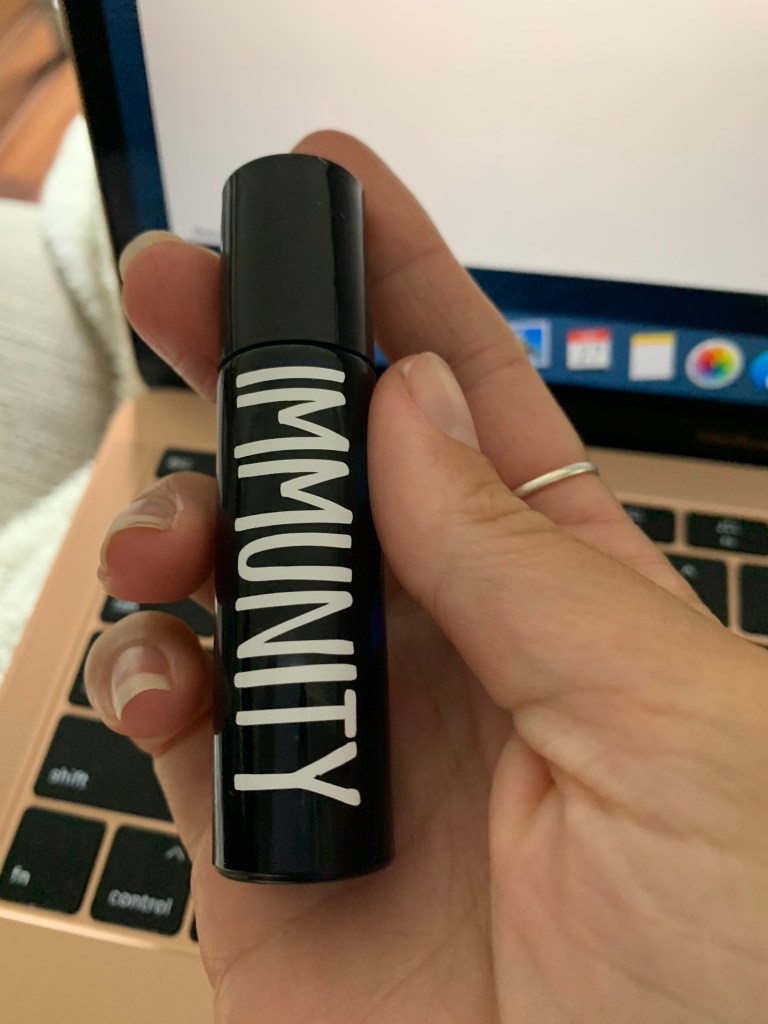
Maybe my biggest success story with oils (aside from immensely helping me with anxiety) was helping my son kick recurrent strep infections! Both of my kids have always avoided getting sick very often, aside from the yucky cold or ear infection here and there but my boy was hit HARD his first year of all day school…kindergarten. It has been almost two years ago now but I remember it pretty vividly. I was room mom for his class and busy helping to plan the class Halloween party. He came home from school with a headache and really rosy cheeks but no other symptoms really so I diffused some thieves and maybe put some on his back and did the usual things I would do when he wasn’t feeling well. Well that night I took his temp and it was almost 105!!!! I was terrified. Still no complaints of sore throat the next day but took him to doctor anyway because of the high temp. He had strep throat and we gave him the antibiotic and it worked right away but it kept coming back, he had maybe 4 or 5 recurrences in just a few months. I was so stressed out and just wanted it to stop it from coming back. I heard about an local oil specialist that could do some oil samples on your skin and see what oil you responded to the most. I took Bronson and he responded the most to Frankincense! Interesting for a lot of reasons but one thing is it has antiseptic properties. I started diffusing for him and also happened upon a recipe for a ‘flu shot in a bottle” that included Frankincense. I hadn’t made my own oil roller before and I was intimidated but ready to give it a try. You don’t want to use undiluted oils on yourself or your kids so if you make a roller with the oils you need you have the proper amount already diluted and can just roll it on whenever you need. So I started using this roller on my son every morning before school on his lower spine and wrists and he did NOT get strep again! Albeit he also quit using the gross germ spreading water fountain at school thankfully but I give 90% of the credit to the roller :). The ingredients are all powerful immune support and it smells really good. I have posted the recipe for the oil before here so make it up if you would like to give your kids or yourself to give yourself some extra protection. I only use during cold and flu season (hello Covid!) and just on the spine and wrists or maybe behind ears. ALSO, I have made up a big batch and am selling a 10ml oil roller for $10. Let me know if you would like one and I will hand deliver locally if anyone is interested :). As far as which oils go, I mostly only use Doterra or Young Living but have also used Plant Therapy in the past and feel good about that company too.
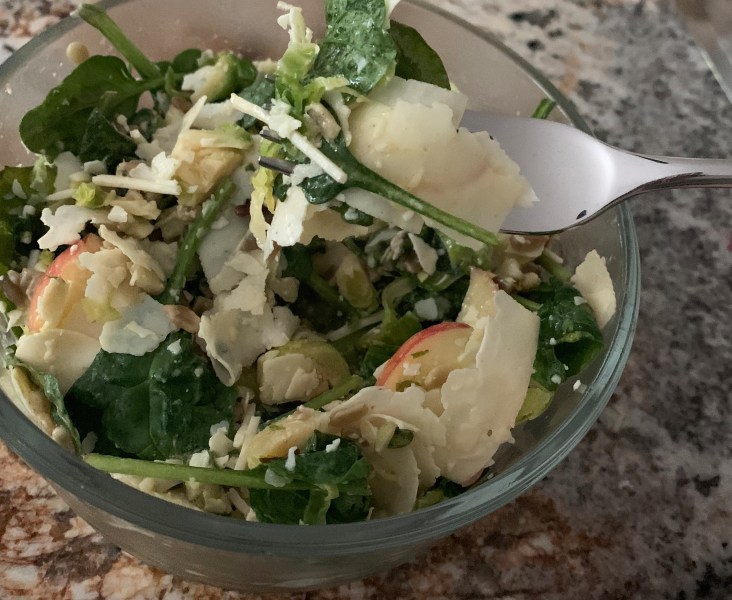
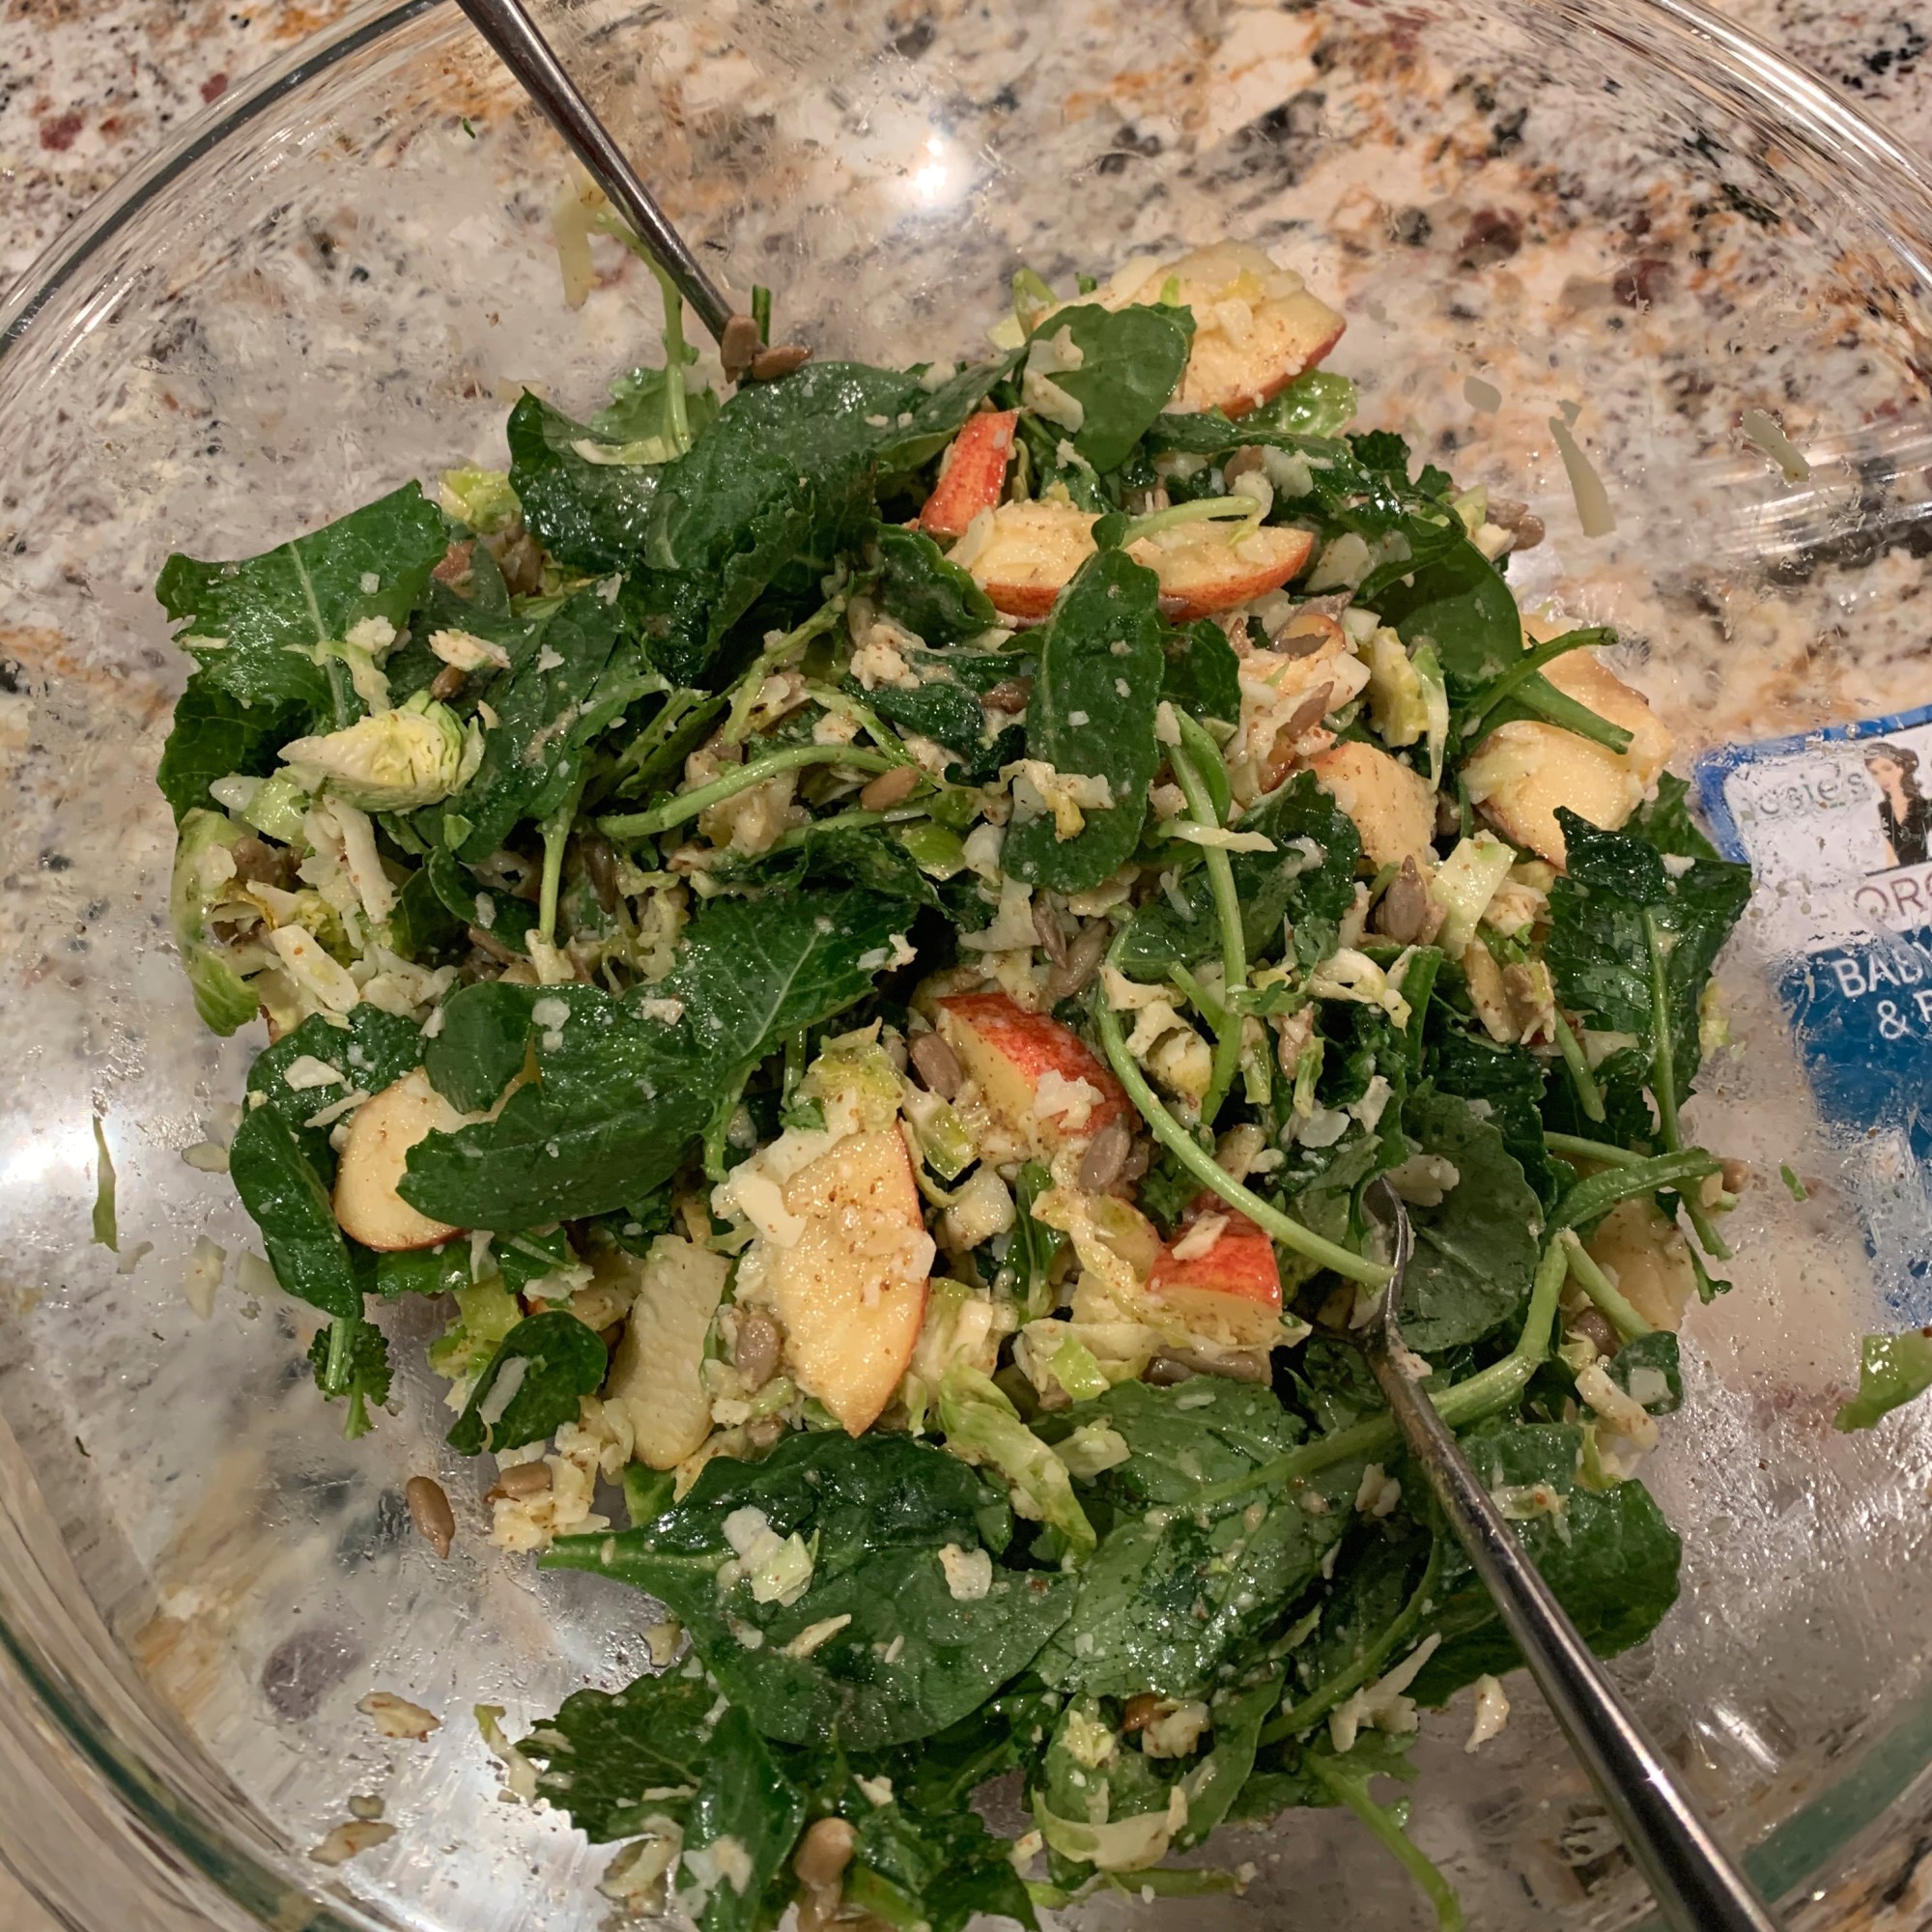
I call this an Autumn salad but in actuality I want it every day of the year. Autumn just sounds so pretty ;). Brussel sprouts are available year round but I suppose are ideal around fall time and apples remind me of Autumn so the name works! This salad has SO much going on and it all just works so well together. Its even better a day or two after making it so I can look forward to it for several days after I make a big batch. My husband hates brussel sprouts which is super annoying but thankfully he doesn’t even know they are in this. If you are one of those whose hatred is really strong though you could def sub out for something else like chopped broccoli, green cabbage, crisp asparagus maybe even snap peas. My usual recipe calls for sunflower seeds but you could substitute with walnuts or pecans or pine nuts (my favorite). Also, I usually do baby spinach but sometimes I do just kale or a mix of both. Ok, recipe below! Would love to hear from anyone that tries it out 🙂
Ingredients:
3-4 cups baby spinach (or kale or both)
6-8 brussel sprouts
1 or 2 honeycrisp apples
sunflower seeds (raw or roasted)
2 cups freshly shaved parmesan cheese
1/3 cup olive oil
2 T dijon mustard
1 clove garlic
1 small shallot
pinch salt and pepper
juice of one lemon
Put whatever greens you will be using in a large bowl. Remove the stubs at the ends off the brussel sprouts than cut all brussels in half lengthwise. Next you will arrange brussel halves cut side down on cutting board and very thinly slice. It should resemble coleslaw when all chopped up. Next core the apple and thinly slice. Arrange sprouts and apple over the greens than top with sunflower seeds. For the next part I usually use a vegetable peeler and get lots of shavings of the parmesan cheese. I DO cheat sometimes and buy a bag of pre-shredded parmesan (picture above) but you do NOT want grated parmesan for this… it will totally change the recipe. I don’t see a big difference buying the good quality shredded parmesan (usually can be found at the deli counter) or shaving myself. I like to use at least 2 cups but if you like more or less whatever you want will work! Cover the salad in the yummy cheese.
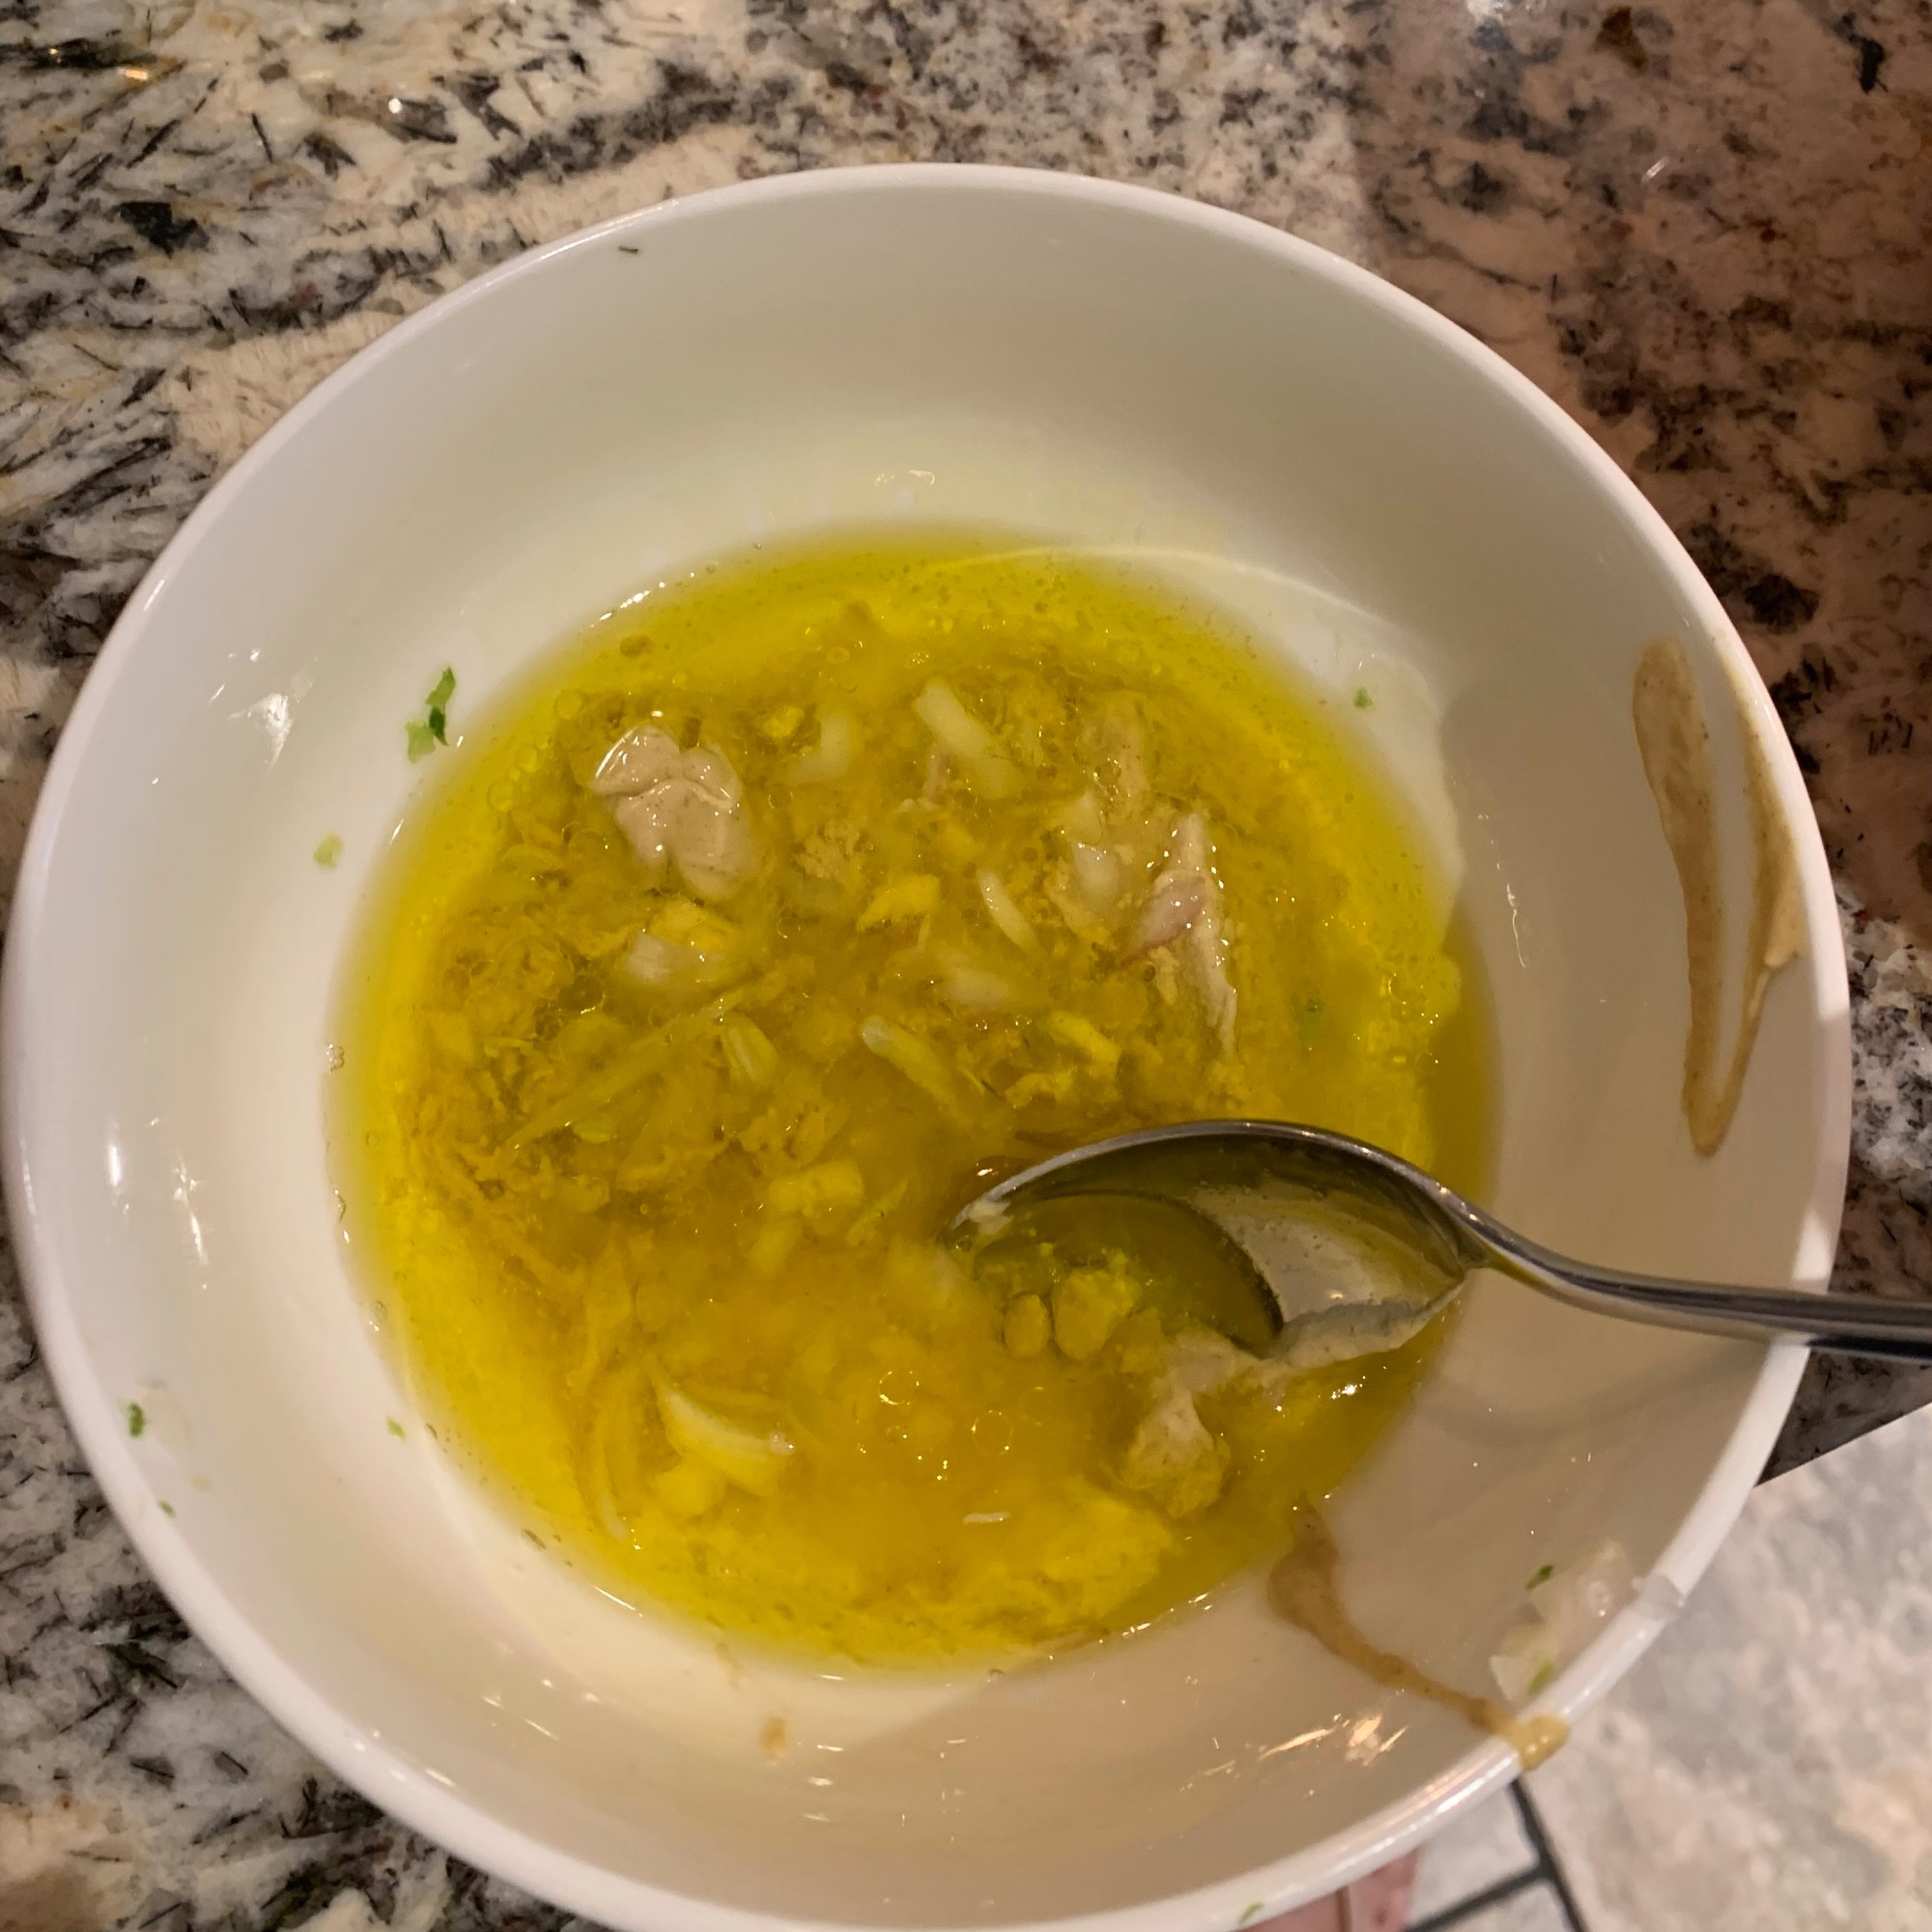
For the dressing you will get small bowl and add the olive oil. Finely chop the shallot and garlic and add to oil. Next add the juice of one lemon and the dijon. Mix well and drizzle over salad. Mix in really well using salad tongs or using your hands or whatever works best. If your salad is a little too dry add some more olive oil.
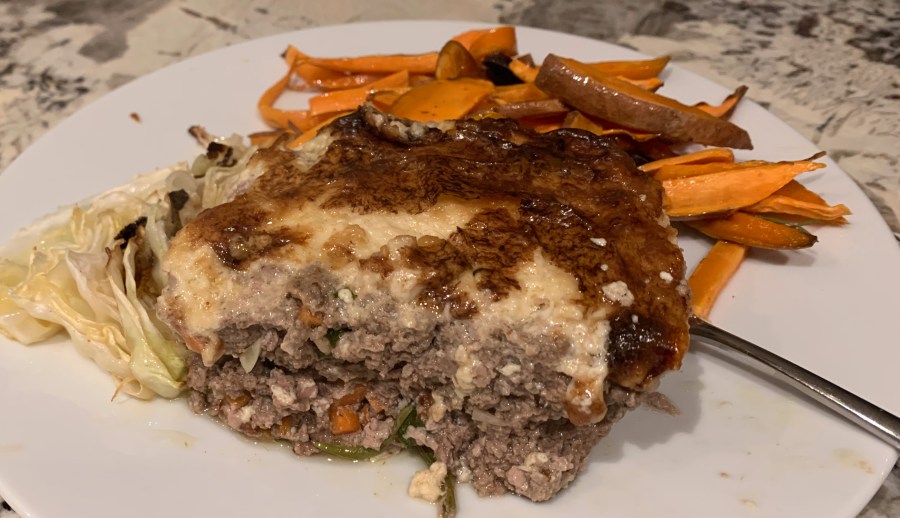
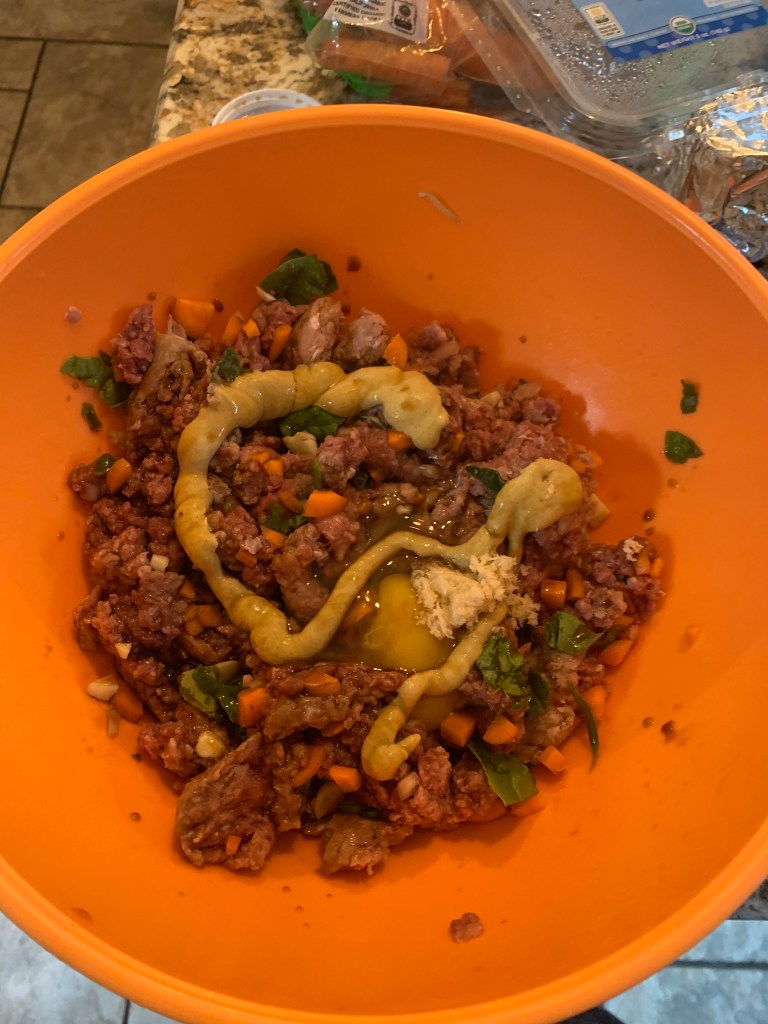
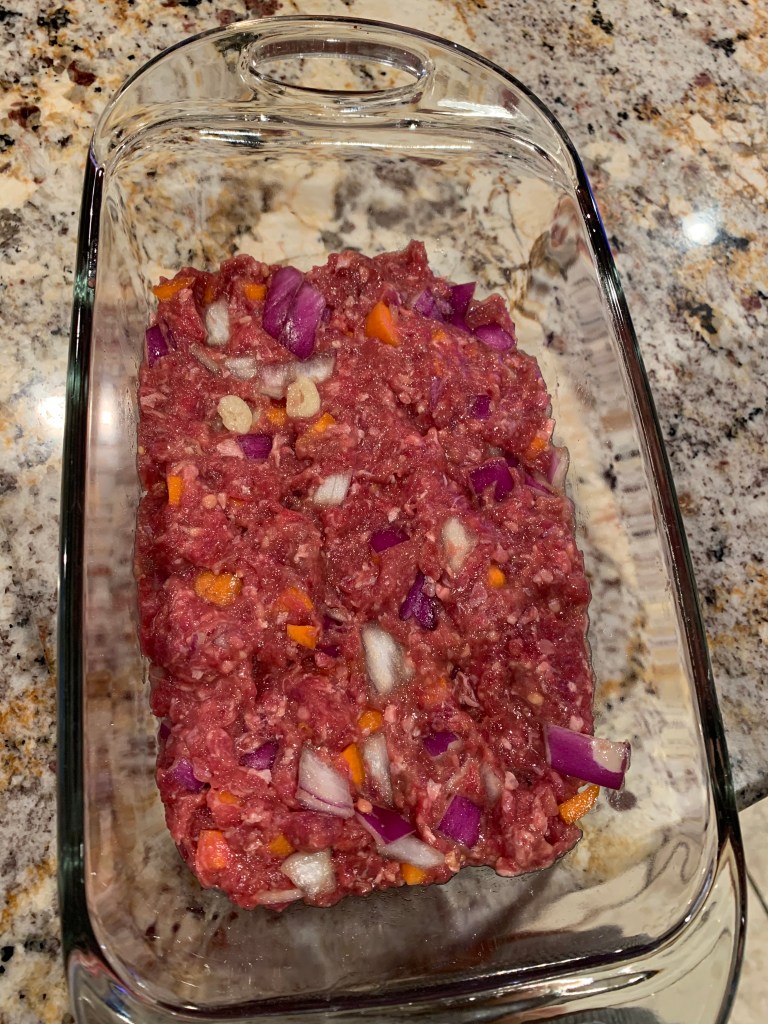
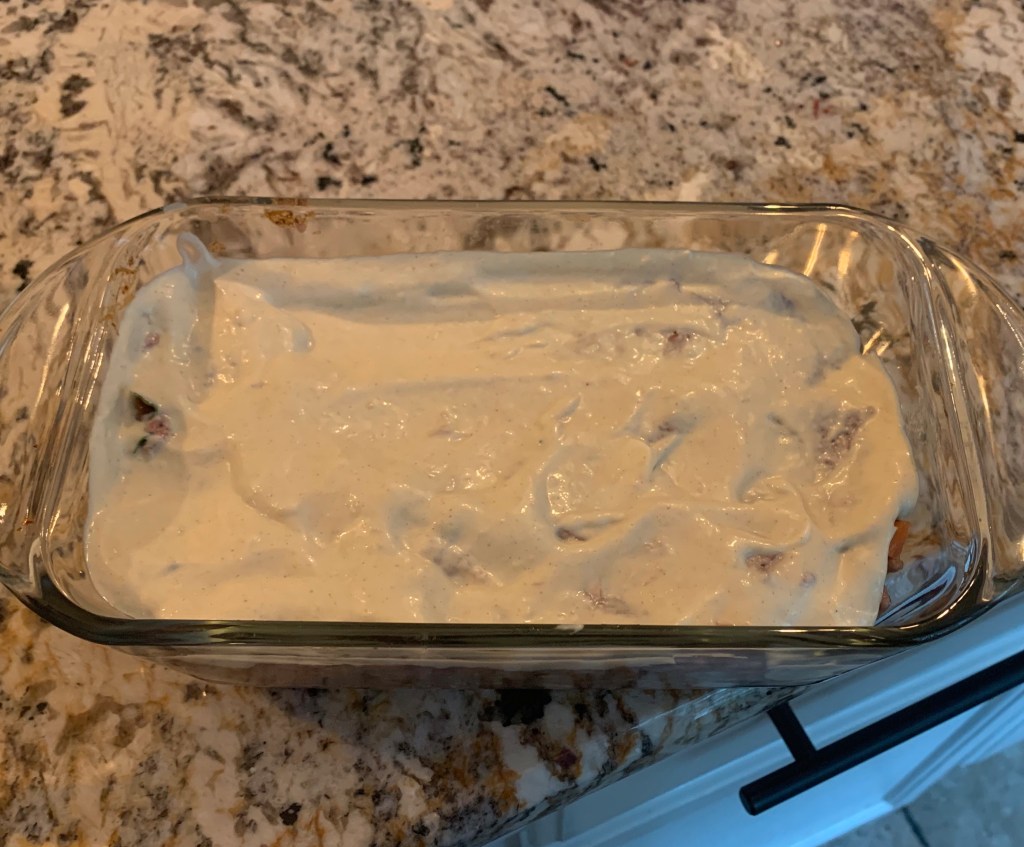
I should start by saying I HATE the word meatloaf. I wish I could rename this to something that sounds way more appealing but I’m at a loss because it does sum it up pretty well. Maybe meat ….I don’t know, I’ve got nothing. So yea, meatloaf. Sounds gross but is SO GOOD! I don’t think I ever ate one bite growing up without gagging and one of the reasons for that is… I’m really weird about ketchup. Like I will eat it with fries etc but it needs to be very far away from whatever I’m eating and I need to be totally in charge of how much I get. SO…def not a big gross bottle smothered on to the top of a big hunk of meat. YUCK. Also… I’m super weird about bread. I am NOT ok with gross wet bread crumbs in my food. So this recipe has neither ketchup nor breadcrumbs and I can make fun of the name all day but in reality I want it ALL the time! My go to recipe uses mayonnaise but if you are not a mayo fan I have an alternative for that. Hope you all love this one as much as me 🙂
Meatloaf:
1 carrot stick
1/2 onion ( I use any kind of onion I have in my fridge or buy a white onion)
Set oven to 400. Finely chop up the carrot, onion, parsley and garlic. Add in the rest of the ingredients and mix well. I usually end up using my hands for this which is not ideal but does the best job. For spices I usually use garlic powder, salt and pepper for sure and sometimes Italian seasoning or ground mustard/onion. Press into a glass bread baking dish. Next, choose your topping and for either you choose you will just mix well in a bowl and spread evenly over meatloaf. Bake for one hour. I usually serve with sweet potato fries and or cabbage 🙂
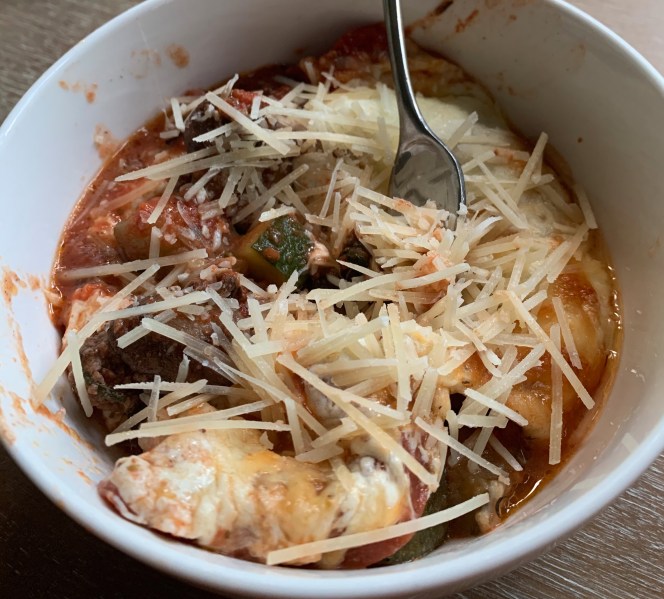
I may have shared my immense love for pizza a time or two on this blog but allow me to go on ;)! I love it pretty much any way I can get it as long as there are no peppers or tomato chunks!!! We travel quite a bit and pretty much every destination one of the first orders of business is to find the best pizza in the area. Soooooo my pizza knowledge is quite extensive, obviously 😉 . In the spirit of trying to stay as grain free as possible it can make it pretty hard to indulge very often so it is important to be creative. I have already posted a grain free option before you can find here. But this is a new twist. No crust to speak of at all and it is dynamite. No joke. SO GOOD. You can really add whatever you would normally put on your pizza but if you are just a plain cheese pizza fan than this post is NOT for you! I typically stick to the same ‘toppings’ each time I make it but sometimes I branch out a bit… sun-dried tomato, pesto swirled in, roasted garlic cloves, artichokes, pineapple, green or black olives, I could go on and on! yummmmmmmmm!!!! My typical recipeis below and is pretty simple, I should note the zucchini can get watery so you need to make sure it is well roasted and maybe even drained or patted dry after roasting. I always put it in though because I feel like it adds a lot. But really, so many ways to make this your own creation, would love to hear if any of you try 🙂
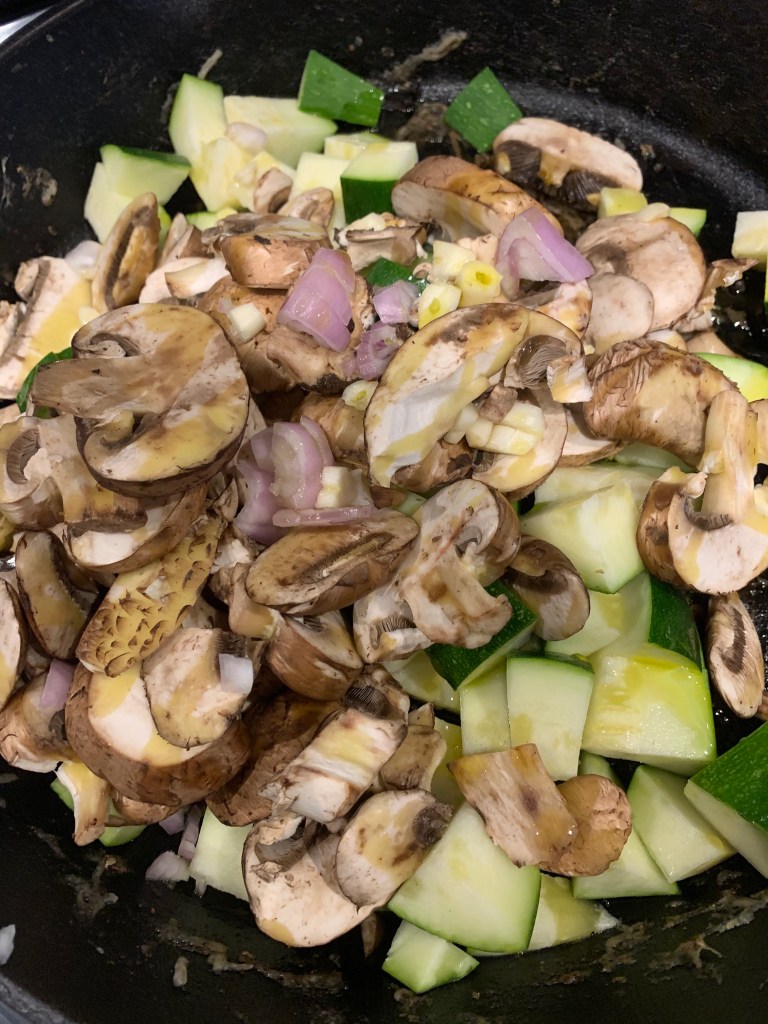
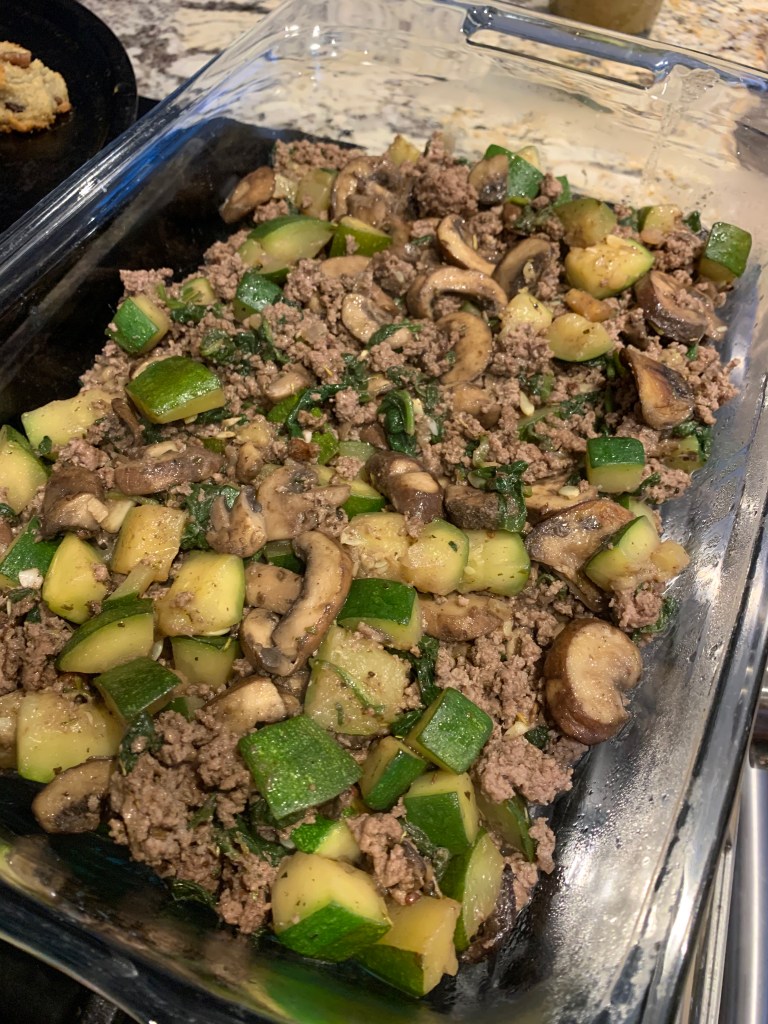
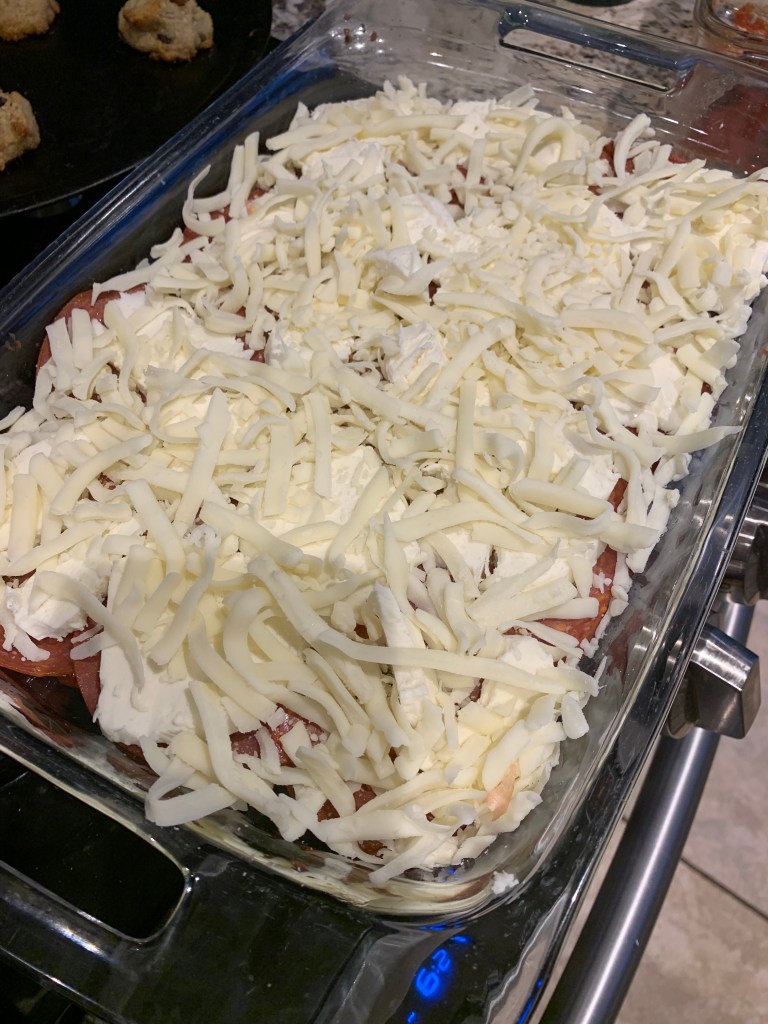
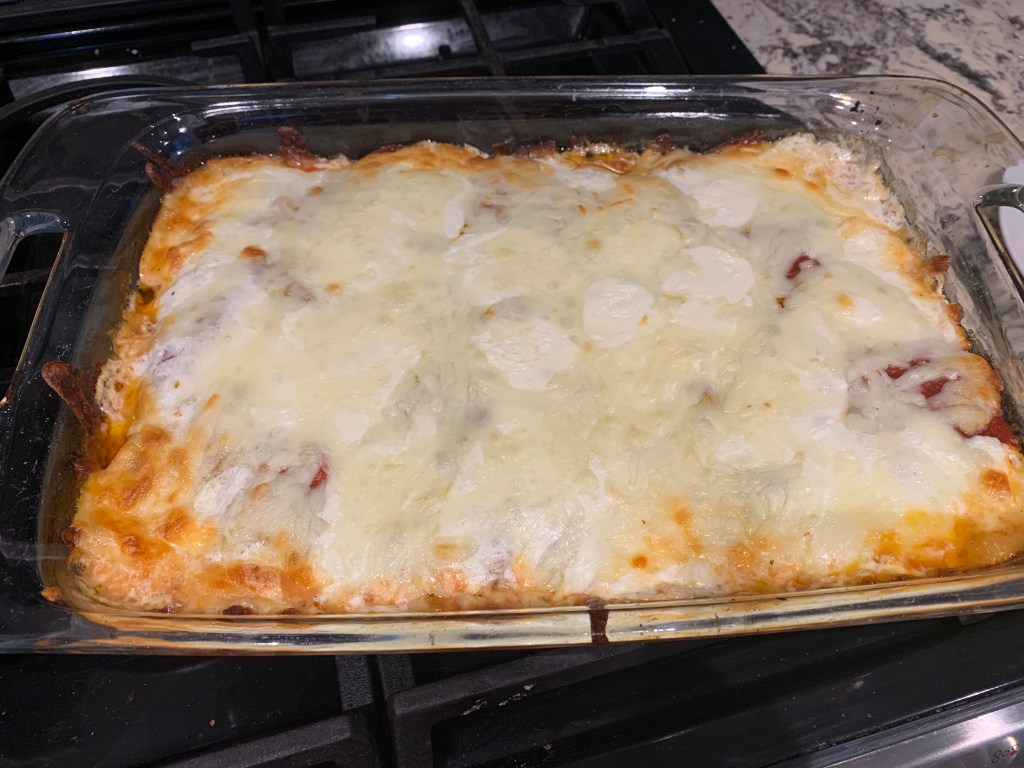
Saute diced zucchini and mushrooms in sea salt and olive oil until tender than add in fresh spinach until it starts to wilt, set aside. Add some diced onion and chopped garlic to a skillet with a bit of olive oil and cook over medium heat until tender and brown. Add in ground beef. Cook until well browned and drain off any fat, than season well with Italian seasoning and a few dashes of white wine vinegar. Mix well and add in zucchini mix. Spread this mixture into a bottom of a casserole dish. Top with a good layer of pizza sauce (find my recipe here) and than a layer of pepperoni. Top with a mixture of fresh mozzarella and shredded mozzarella. Bake at 375 for 30 minutes and serve up with sea salt and some fresh Parmesan.
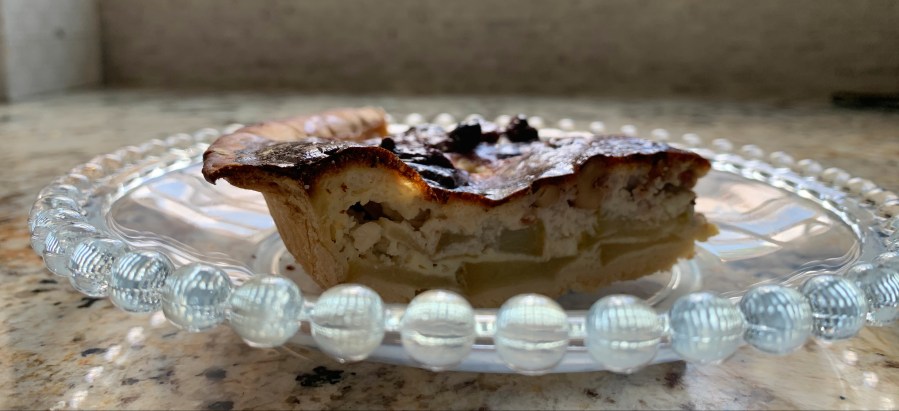
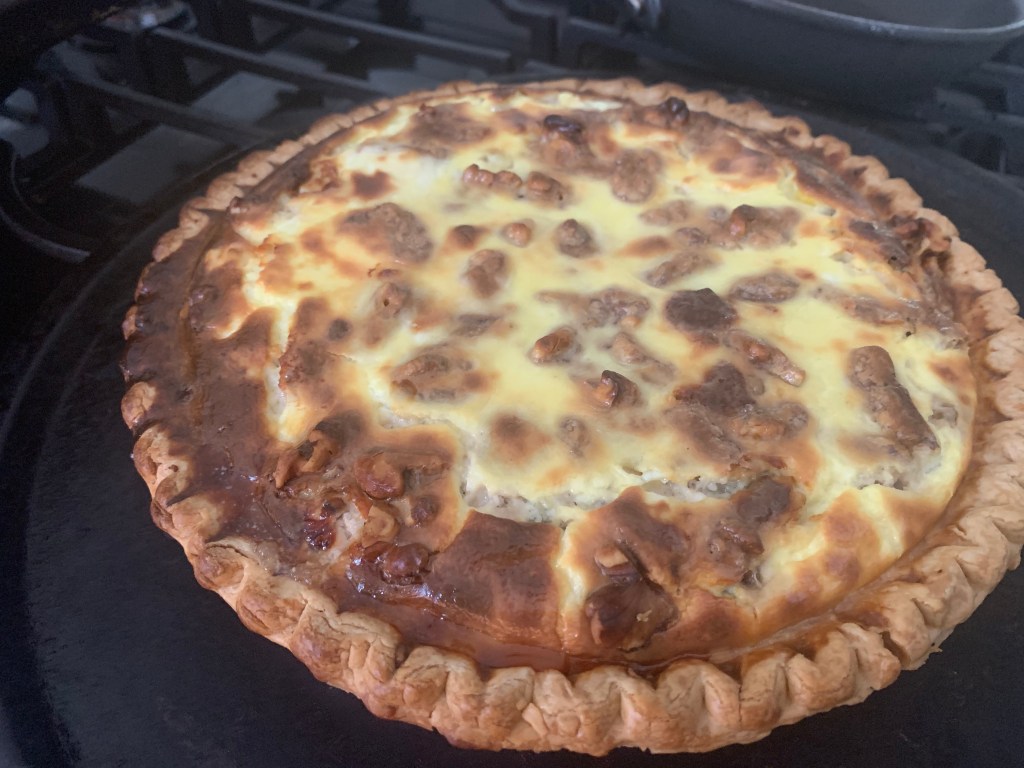
I’ve been making a variation of this quiche for years. Our favorite restaurant where we live serves something similar occasionally and while we really like it, it is super heavy on the egg part and really light on the blue cheese and pear (our favorite) part! So I set out to make my own? This is more of a special occasion breakfast in my opinion but my husband wants it every single weekend, ha! He loves it so much which makes me happy :)… but I get bored so I change up the crust recipe or the type of nuts I use or even the amount of eggs I use occasionally. I don’t really think quiche is the right word for what this is… its definitely more like a savory French tart. It absolutely has a French bistro vibe to it and who does not LOVE a French Bistro vibe?! It is really light and fluffy and just packed with all kinds of unique flavor. Since I converted to mostly grain free awhile back I don’t use a traditional pie crust but if you are not worried about consuming grains you could just use a frozen deep dish pie crust or one of those pre-made pie crusts you just roll out into a pie dish. Try it and LOVE It!!
Grain Free Pie Crust:
1 stick cold butter
3/4 cup coconut flour
2 eggs
Filling mix:
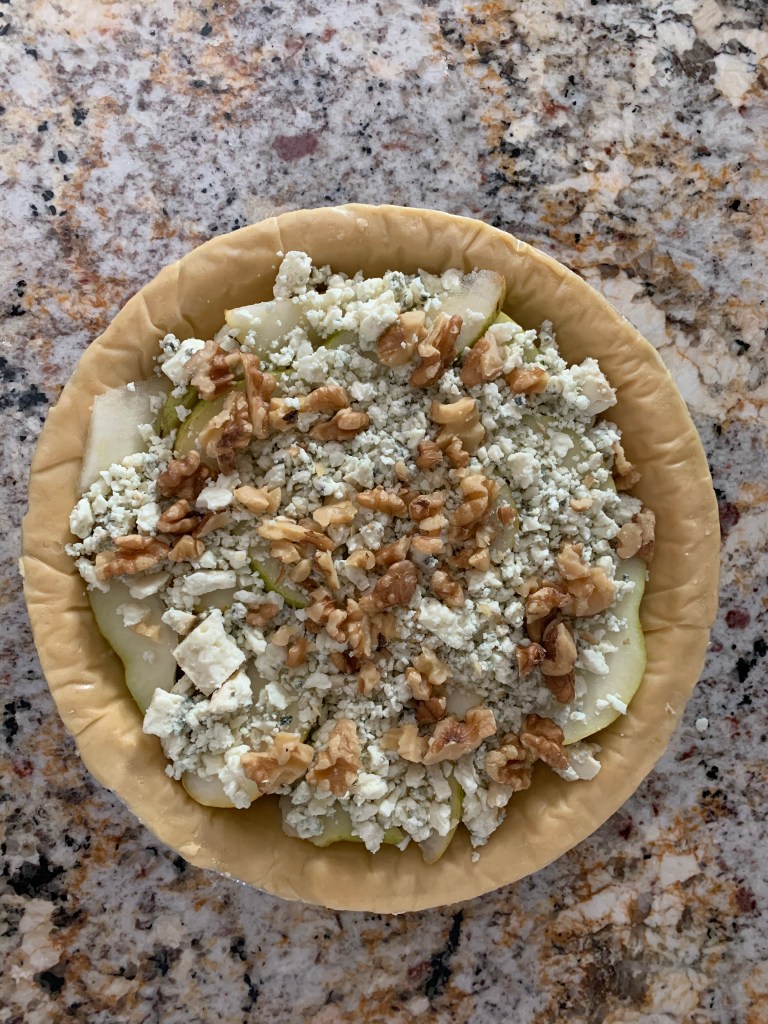
2 ripe pears sliced
4-8 oz blue cheese
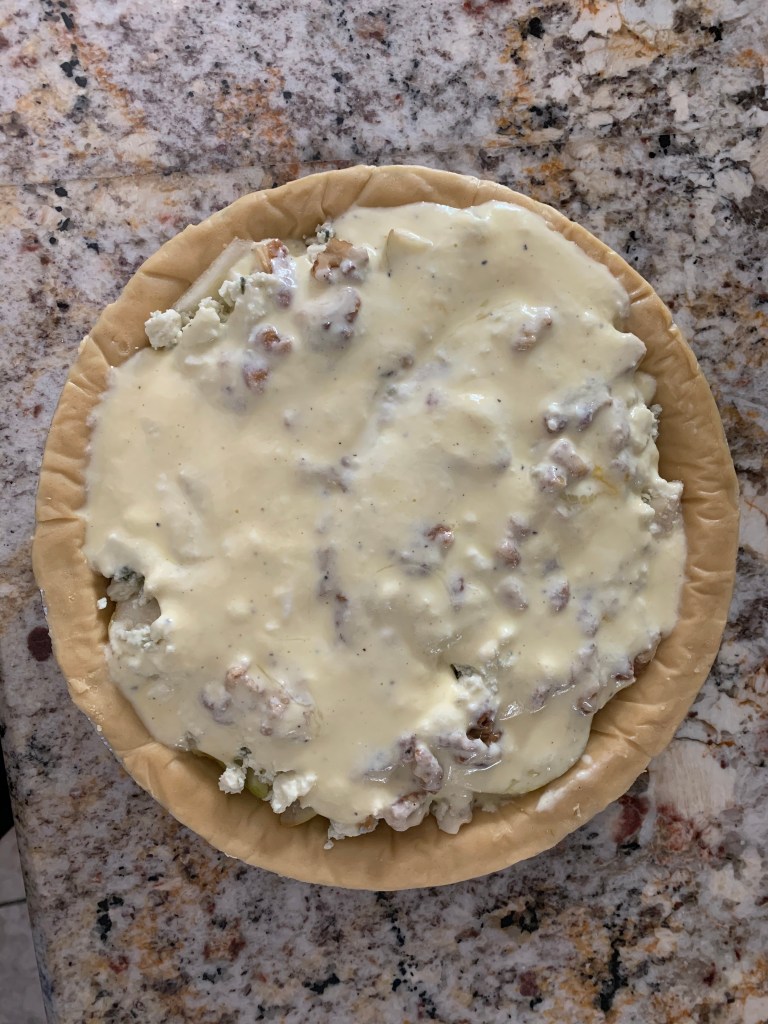
2 eggs
1/2 cup sour cream (full fat)
1/2 cup half and half
s&p
1/2 cup chopped walnuts
For the crust: cut the butter into chunks and put in food processor. Add in coconut flour and eggs and pulse until well blended and in a tight ball. Press into greased pie dish.
For the filling: Thinly slice two ripe pears. Arrange them flatly into the pie dish. Top with blue cheese and chopped walnuts. We usually go heavy on the cheese but anywhere from 4-6 oz is good. Crack two eggs into bowl and beat well by hand. Add in sour cream and half and half and s&p and mix well (if too thick add a little milk to thin it a bit). Pour over the pears. Bake at 425 for 35-40 minutes.
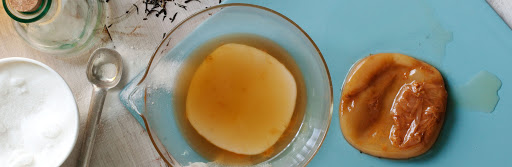
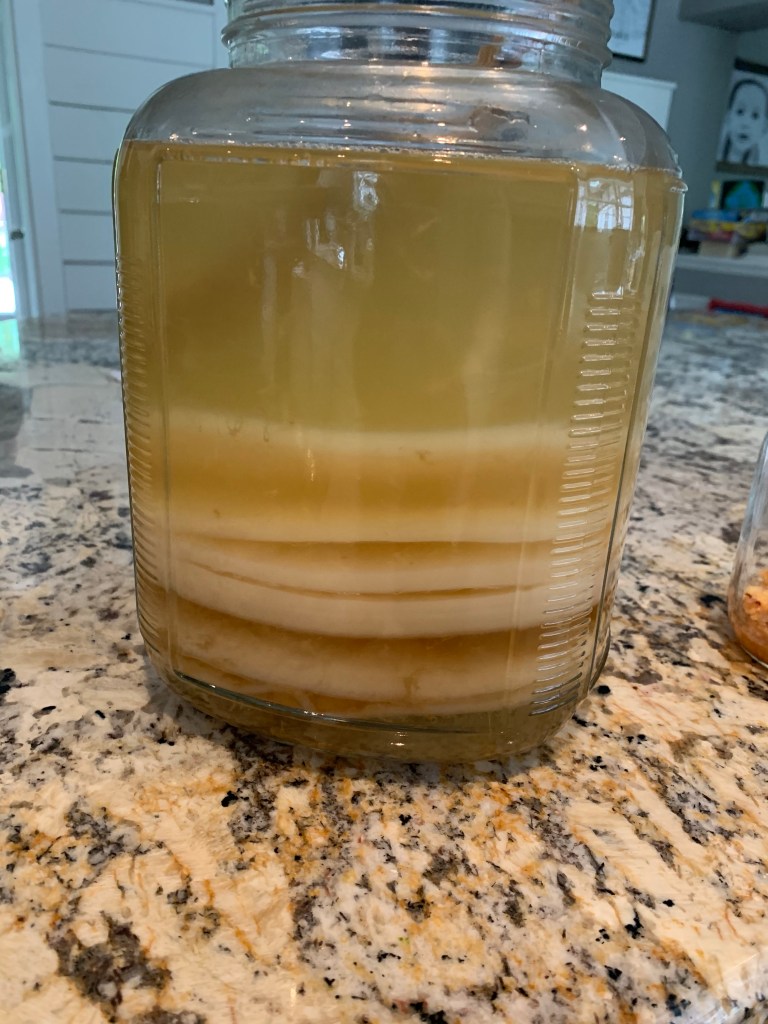
Raise your hand if you love kombucha!? I really just can’t say enough good things about it. The first time I tried it (or even heard of it for that matter) I was living in California and it seemed to be super popular out there. This was like 10 years ago before I had even seen it sold in stores in Illinois. It was SO good and of course the bottle talked about the probiotics it is known for and I knew I needed. But it was also expensive and had a lot of sugar and additives in it. So it was a rare occasion kind of thing. Fast forward many years later and I’m back in Illinois and was talking about boosting the immune system with a like minded friend of mine. She had been brewing her own kombucha for years and told me there was nothing that worked better for her family at boosting their immune systems than kombucha. I have two kids that are in pretty great health but one of them had numerous bouts with strep throat not to mention just liking the idea of giving them an extra boost against colds/flu (now add COVID to the list) etc. So she gave me a hunk of her verrrrrry well used SCOBY as well as some of the “mother”. The mother is basically just the liquid at the bottom of the batch of kombucha and is necessary to start your own batch, possibly even more important than the SCOBY. The SCOBY stands for symbiotic culture of bacteria and yeast and is formed after the completion of a unique fermentation process of lactic acid bacteria, acetic acid bacteria, and yeast.
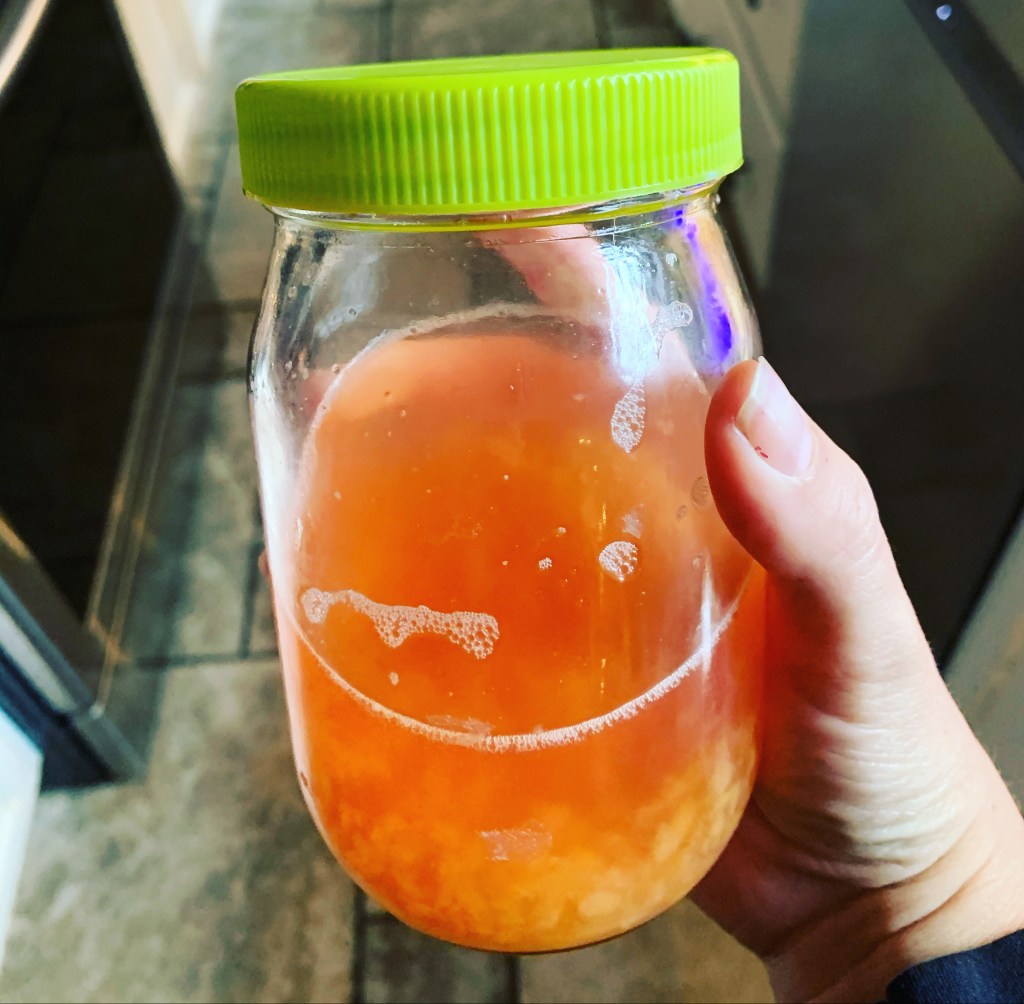
maybe 1/2 of my babies!
Each time I make another batch I produce a new SCOBY (I call it a baby) and at this point I have had to throw some away which I cannot tell you how heartbreaking that is to do! I’ve grown oddly attached to my kombucha and all that comes from it :). So far I have not been able to make my children or even my husband believers/lovers but the benefits for me have been LIFE CHANGING. Seriously life changing! I have been dealing with stomach issues for 20 years at least and like magic they were over in a month. SO WILD. I never would have believed it if someone had told me about it otherwise. To start my first batch I put the mother and the SCOBY at the bottom of 2 gallon glass jar and added 1/2 gallon of cooled brewed green tea sweetened with 1/2 CUP OF SUGAR!!! The sugar feeds the SCOBY so its absolutely necessary unfortunately. I put a cloth over the top and put it under my cabinet for two weeks to ferment. Two weeks later I checked it out, saw I had grown my very own SCOBY, tasted my batch and screamed success!!!! From there I poured off most of the liquid reserving about two cups of mother and my old SCOBY and newly formed SCOBY and started the process again. I get just enough pour off to last me until my next batch is complete. I only drink 1/2 cup a day and that is all anyone really needs to reap the benefits. I have gifted a few babies here and there but otherwise I have had to throw them away or just keep in the jar to help ferment the next batch. Proponents of Kombucha say it helps in improving digestion and diabetes, strengthening the immune system, reducing blood pressure and is said to be detoxifying. It is also said to help with rheumatism, gout, nervousness and promotes healthy liver function and cancer fighting. I can absolutely attest it has helped with digestion and immune system AND the calming effect. If anyone would like to get a baby and start your own batch PLEASE hit me up because I would love to not have to throw another one away :). Lately I have been experimenting with F2 or second fermentation which involves fermenting a few days longer in an air tight container and adding fun flavors. It’s like a fabulous, fizzy homemade soda. So far I have done peach/ginger and WOW, it is so good.
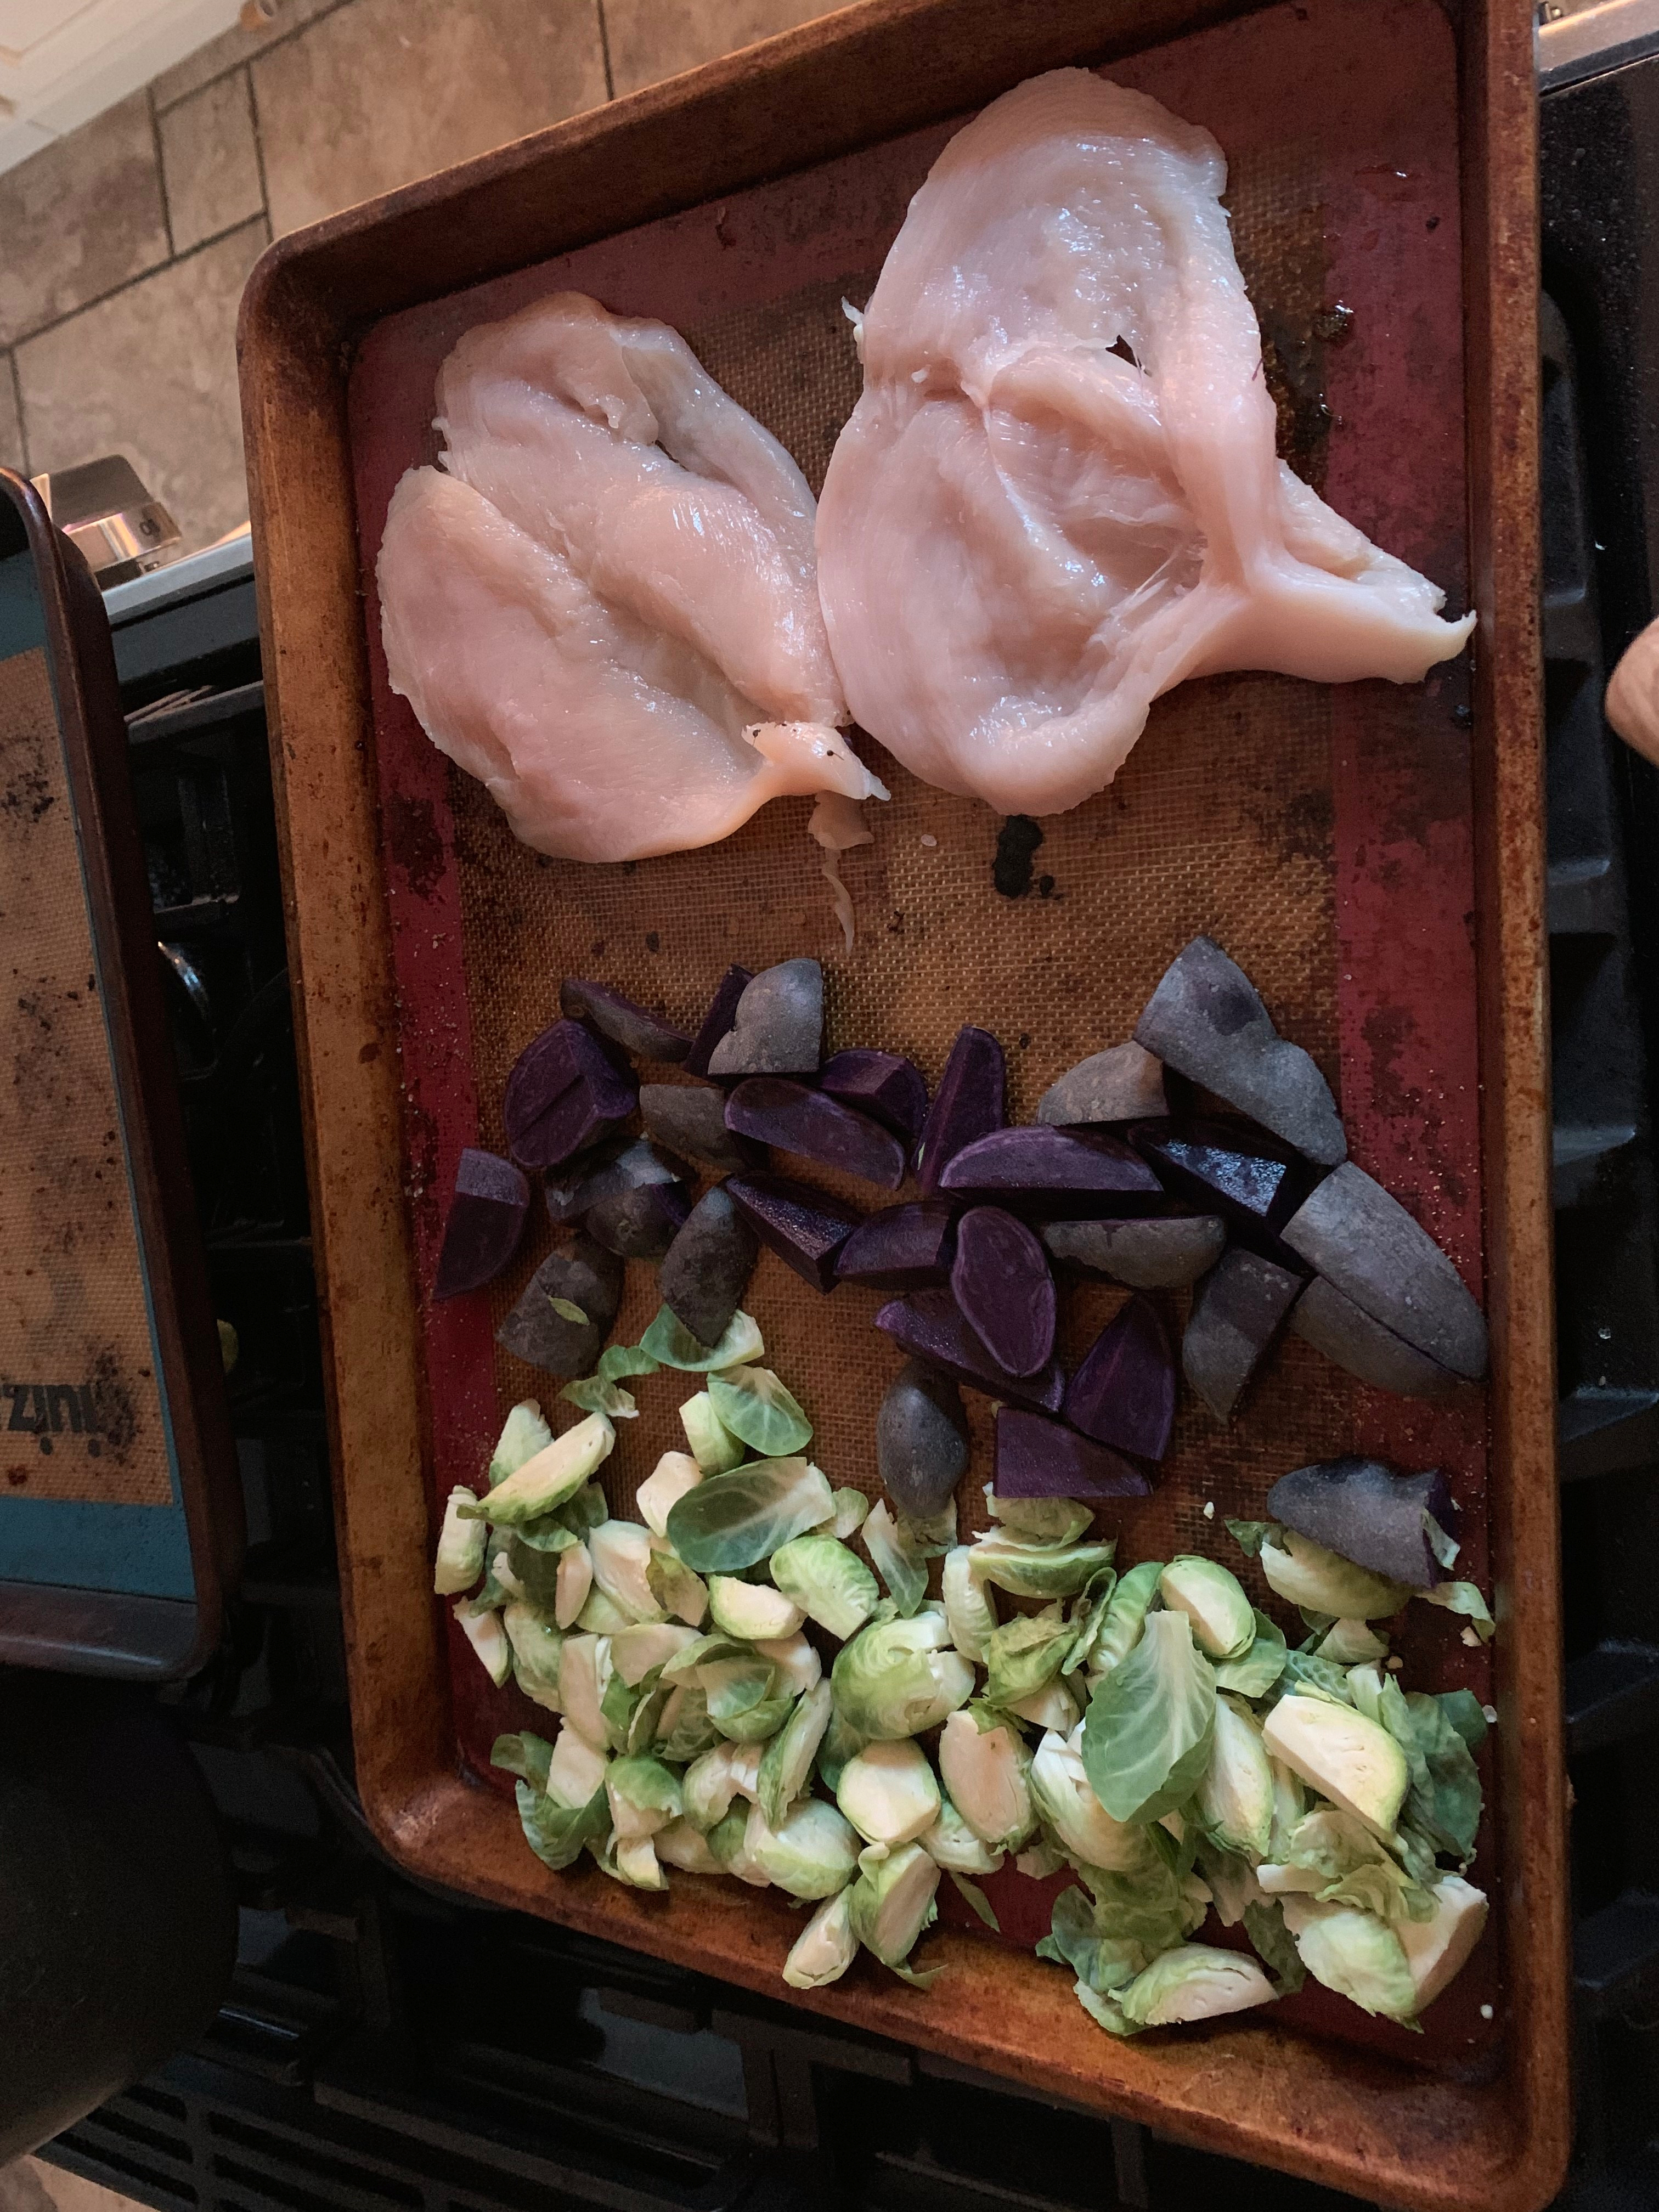
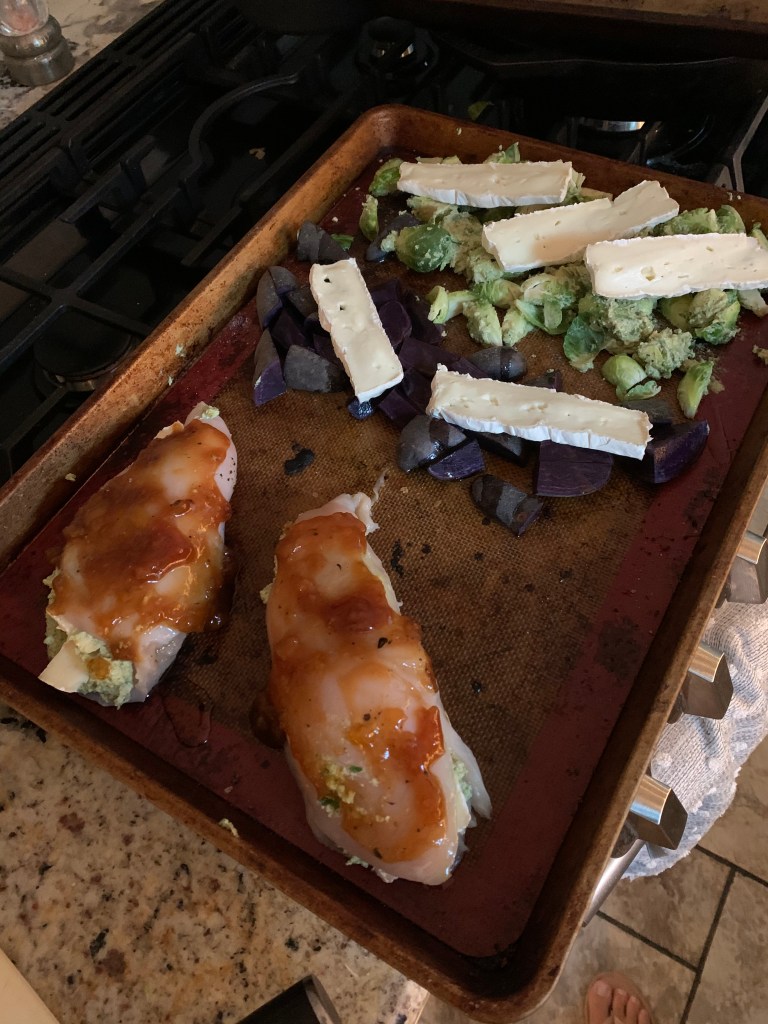
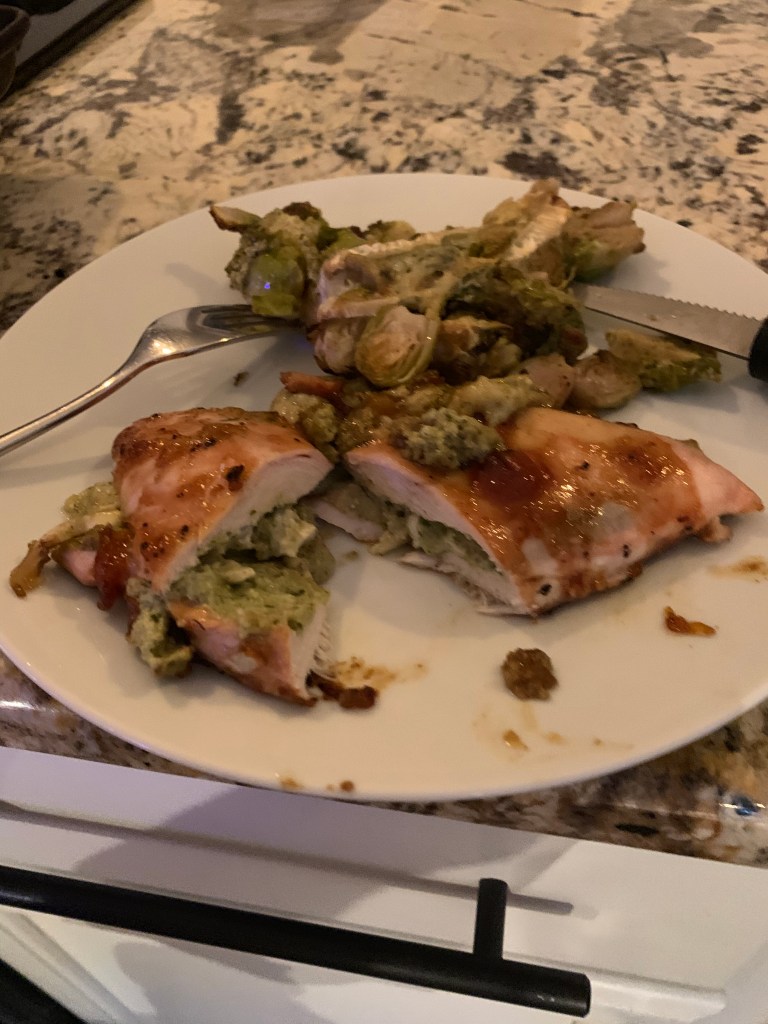
Wow, it has been a REALLY long time since my last post! Yikes! When I finally started sharing this space with my few close friends (and for the entire internet to see) I committed to posting at least once a week, if not more. I went a few days over here and there but mostly stayed pretty on top of my commitment. I have tried to keep my posts light and fun and of course educational 😉 but the current state of…everything(!) has been making me feel a little darker and heavier than I would like and did not leave me in a good place to write. I’ve mentioned before I hate living in fear but… things have been feeling bleak lately! I’m really trying to turn that feeling around. Practicing mindfulness, spreading kindness. Something that keeps popping in my head is PERSONAL ACCOUNTABILITY! Being responsible for our own actions and the repercussions of those actions and just overall striving to be a good, kind, loving person… that washes her hands a lot and wears a mask when around other people. Fun times friends, FUN times. That said I HAVE been cooking/baking quite a bit so I will be catching up on the lost time :). First up!! The ever so amazing… Stuffed chicken II!! I hadn’t made this in months because I was sticking to simpler recipes while we were on lock down. So making it again after several weeks was such a treat and I wish I had doubled the recipe because I wanted it again the next day :). I’m sure I have gone on about how much I love brie in the past and this recipe HAS it! Plus a crazy good goat cheese based pesto that is kind of like a green goddess spread. I usually make this as a one pan dinner with two of our favorite vegetables… purple potatoes for my husband and brussel sprouts for me. Of course you could sub these out with whatever your fave veggie is and most likely the cooking time will remain the same. But if not, use a different pan! Ok recipe below!
Stuffed Chicken II
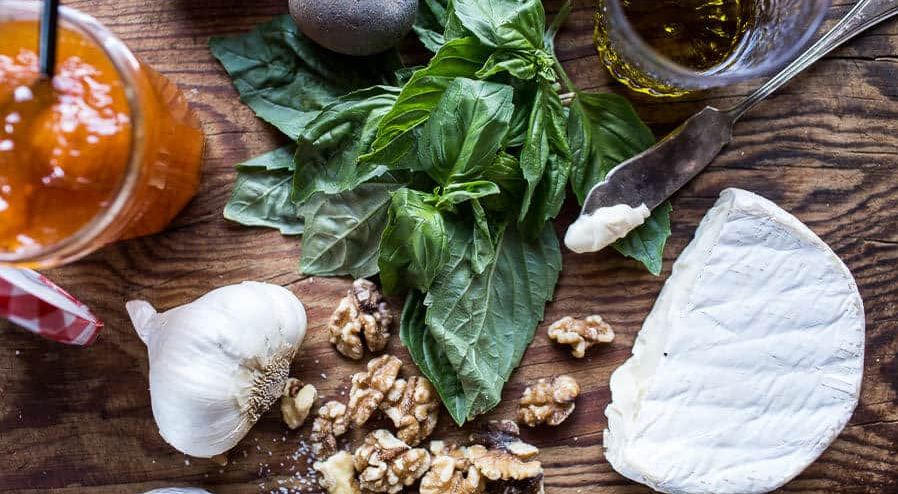
8 oz goat cheese (room temperature)
basil leaves (bunch)
handful of walnuts
drizzle of olive oil
pinch salt and pepper
clove garlic
splash of half & half or any milk you have on hand
1/4 cup shredded parmesan cheese
Two chicken breasts
7 oz brie
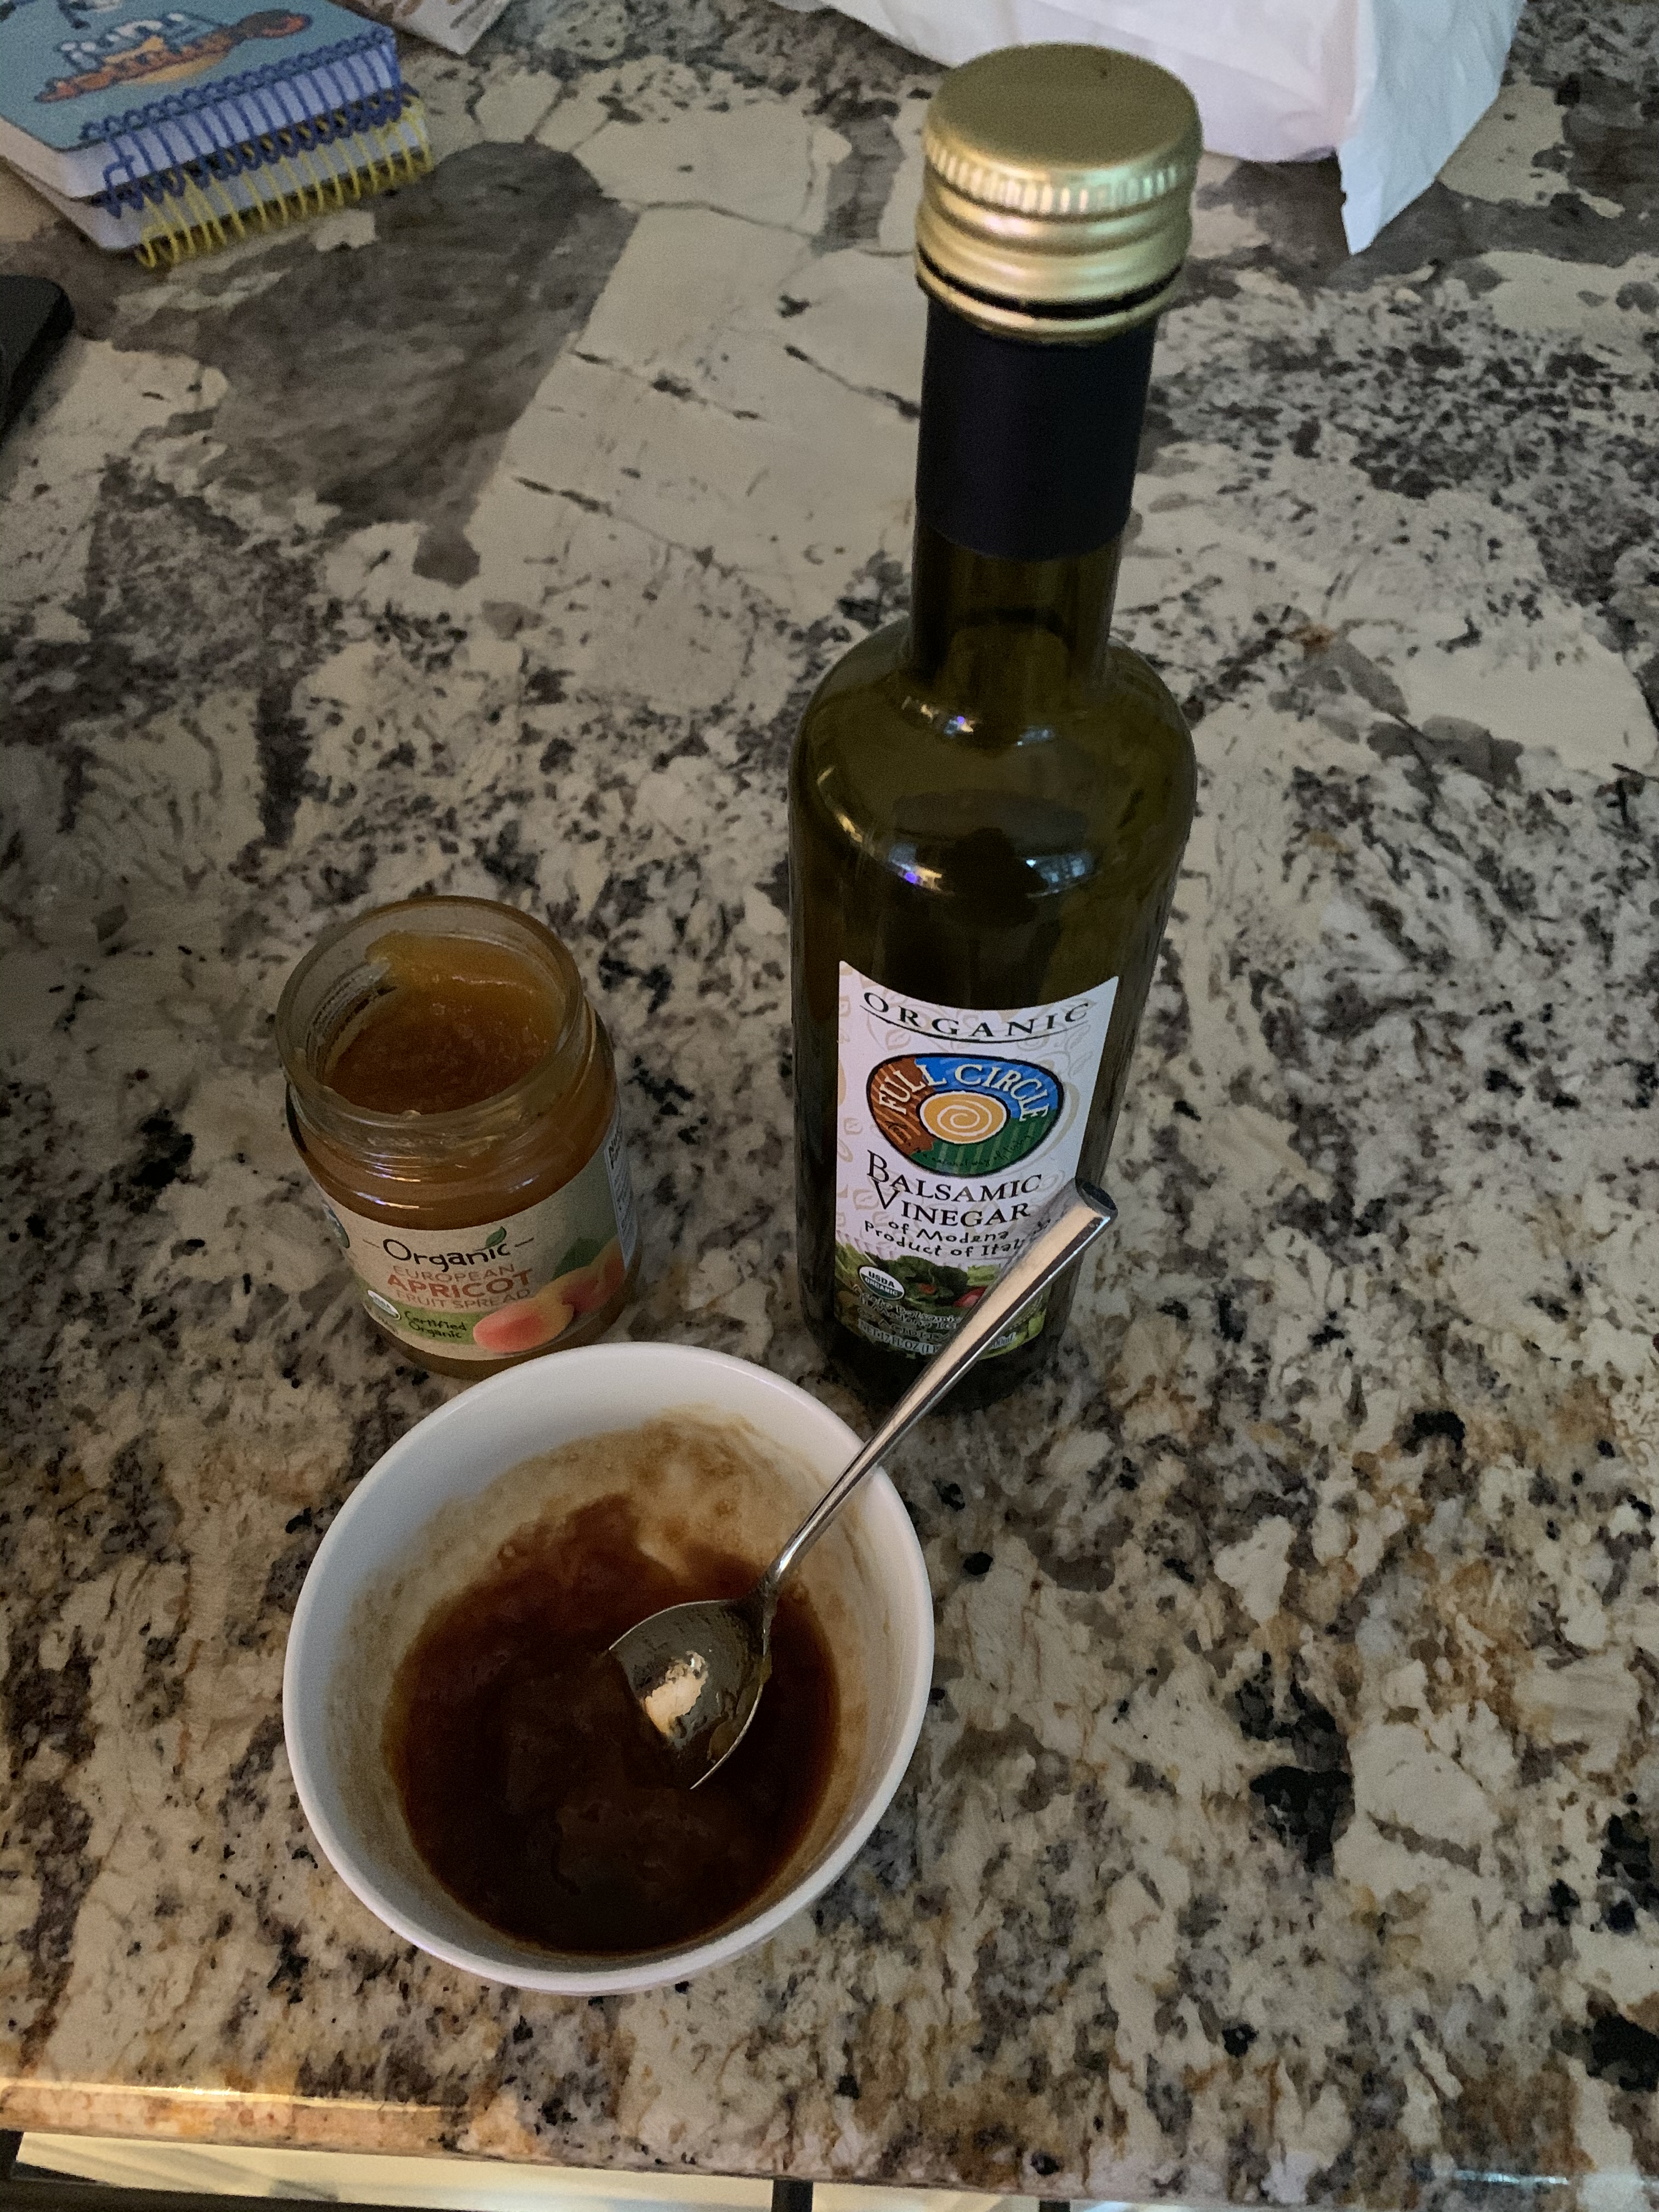
1 tablespoon balsamic vinegar
2 tablespoons apricot preserves
brussel sprouts
potatoes (purple if you can find them!)
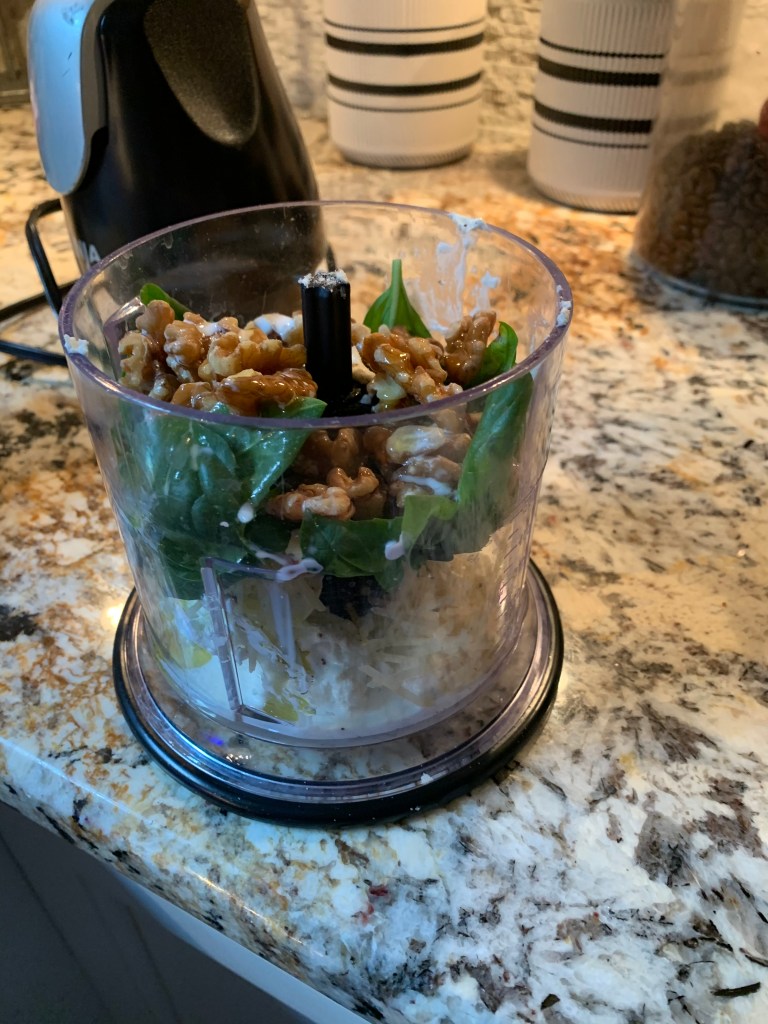
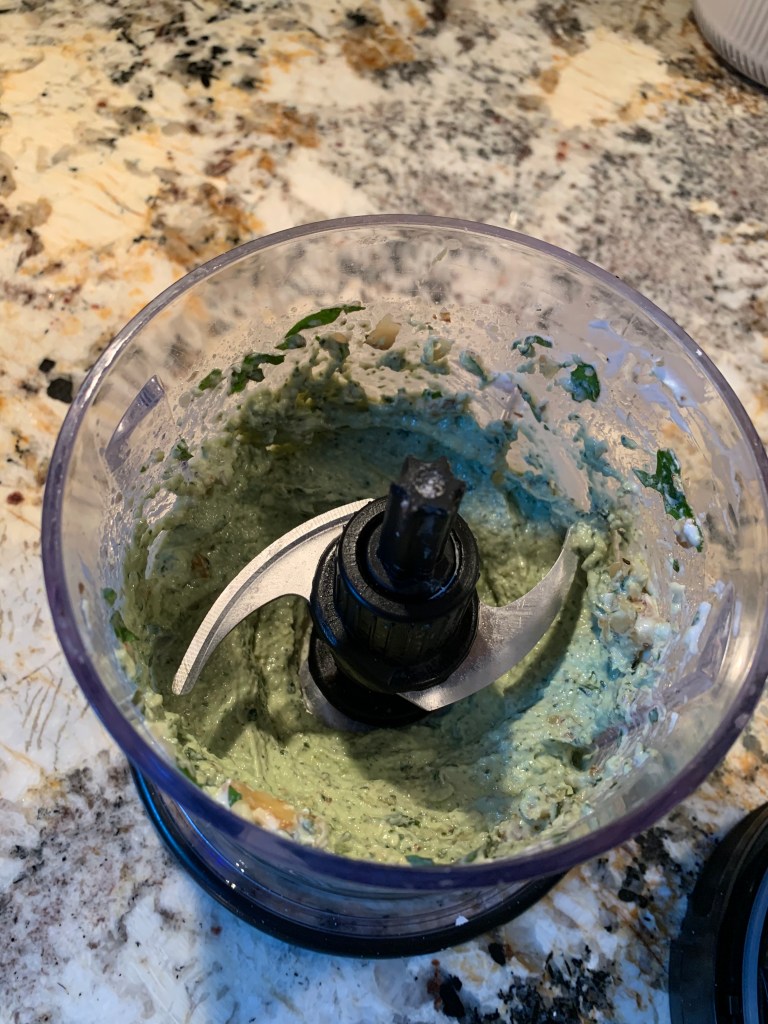
Start by making the pesto. In a food processor combine the goat cheese, basil, walnuts, s&p, olive oil, splash half & half and shredded parmesan. As long as your goat cheese is room temp it should all mix up pretty quickly. Set this aside. On a cutting board take your two chicken breasts and butterfly them. I like my breasts REALLY thin so I actually butterfly it twice, taking the bottom layer totally off and using it for something else and than butterflying again and leaving in tact this time. Push the breasts down onto a baking sheet and smother both sides with the pesto. I don’t use all of it on the breasts but most of it, I save some to mix into my vegetables. Ok, now cut your brie into strips maybe like 1/4 of an inch thick. Push on top of the pesto on the chicken and than close the chicken up. Now mix the balsamic vinegar and preserves in a small bowl and spread over the chicken. Make sure the chicken is on the far side of the pan. Now dice up your potatoes and brussel sprouts or whatever you are using and put on the remainder of baking sheet. Top with olive oil and sea salt and if you have any of the pesto left mix it all in. If I have brie left I put it on top of the veggies too. Bake at 400 for 30 minutes. YUM!!
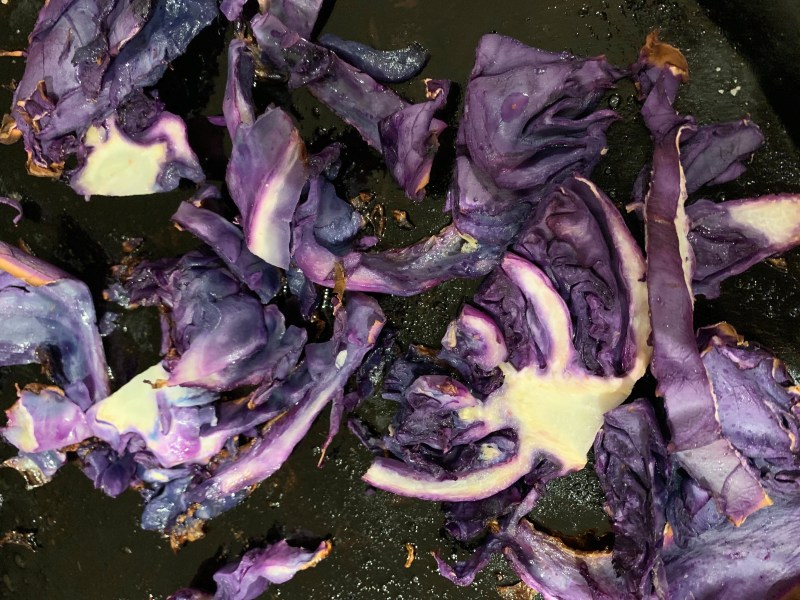
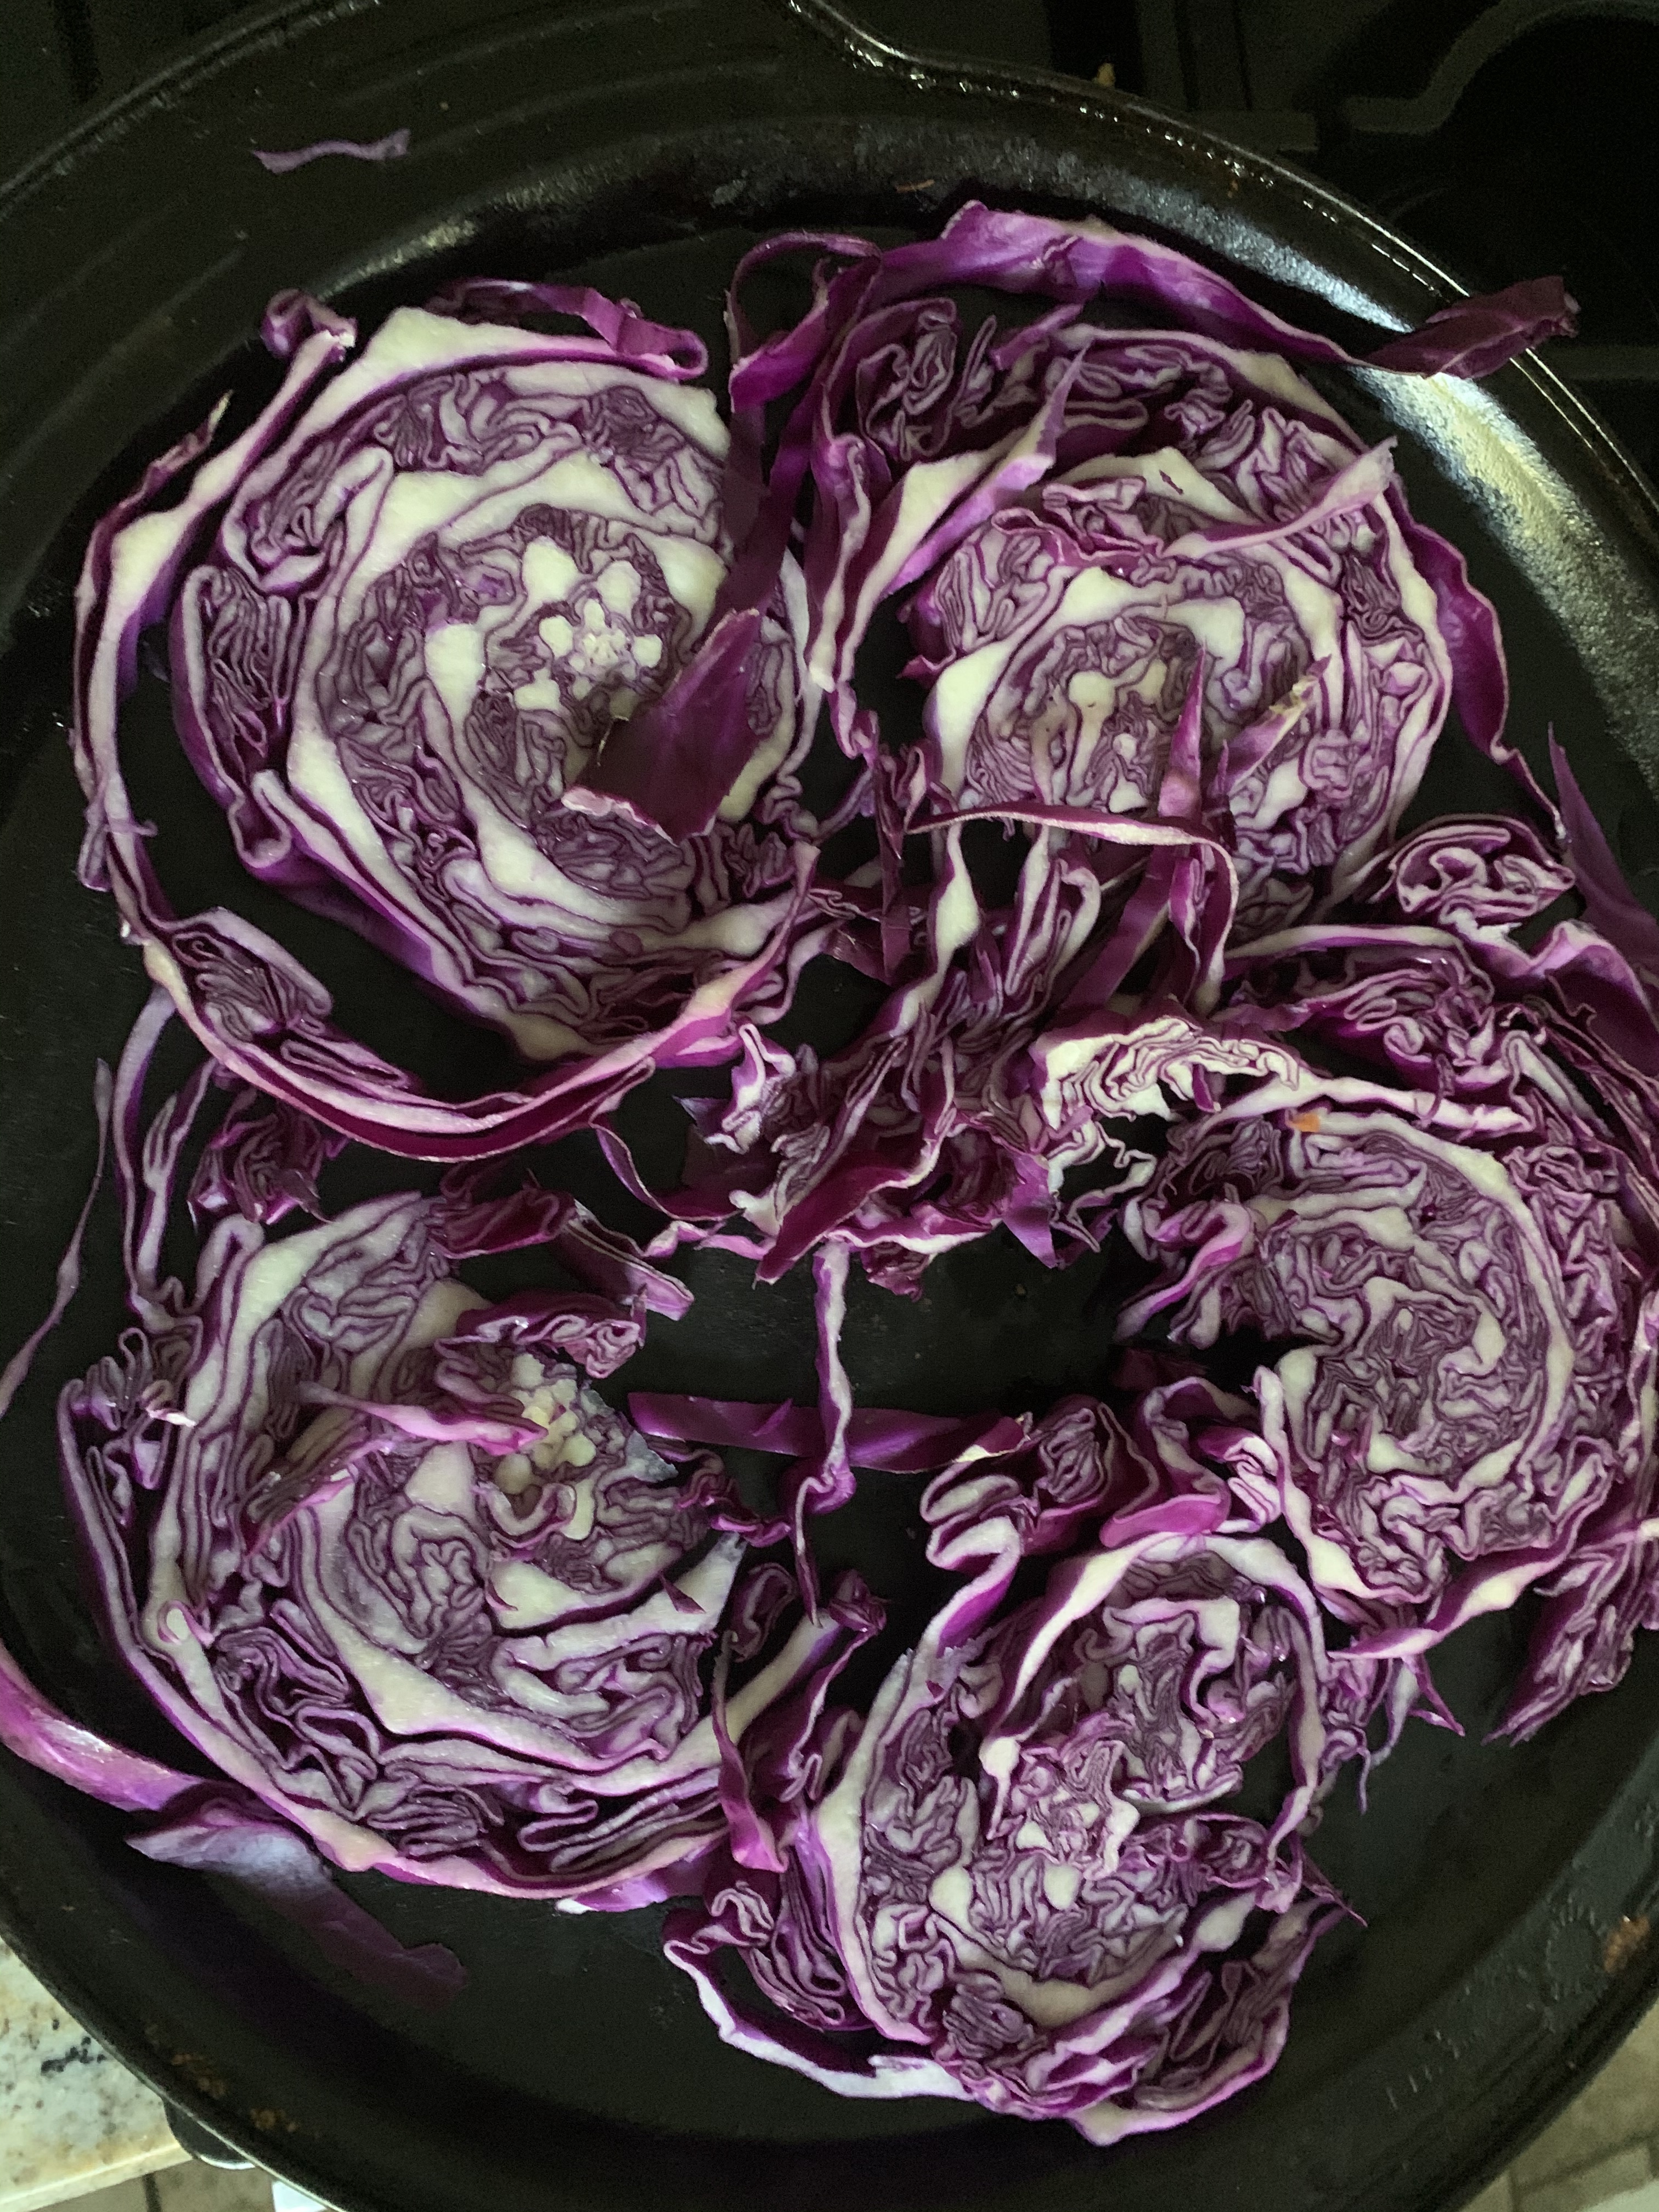
Really simple recipe today and I hope I sound convincing because it is LIFE CHANGING!!!! Roasted Cabbage. So simple but SO good. I never ate much cabbage before I started making this…unless it was from coleslaw or sauerkraut when I was young and my dad would force me to eat it (which I now love). Growing up we consumed a shockingly small amount of vegetables. Like, I’m fairly certain I didn’t even see a vegetable between the years 1986-1999. Unless it was french fries, ha! I’m sort of joking of course but really, I was not a fan and they weren’t pushed on me. Actually, I would not say I became a fan of vegetables until my mid 20’s and I finally learned to respect and love sweet potatoes like the gift from God that they are! Than I started branching out more and more. Brussel sprouts… I love love love love love brussel sprouts. Parsnips, broccoli, spinach, asparagus. YUM. Give me all the vegetables basically. Well, you can keep lima beans. Anyway, I saw someone eating or talking about eating roasted cabbage once online and I thought to myself hmmmm, that sounds interesting. Cabbage never made it to my grocery list before that and I would only have it on the rare occasion outside the house. Once, in my pre-vegetable loving days my husband asked for a head of iceberg lettuce but I bought him a head of cabbage instead, he was so grossed out and loves telling that story almost 20 years later while I roll my eyes dramatically. Anyway, roasted cabbage. I almost always buy red cabbage because it is just sooo beautiful! But green works just as well. Sometimes I roast it and than chop it up to use in a taco bowl or something like that but mostly we eat it just as it is. Ok, on the the recipe! I hope you all love it as much as I do!
Ingredients:
one medium head of cabbage
sea salt
olive oil
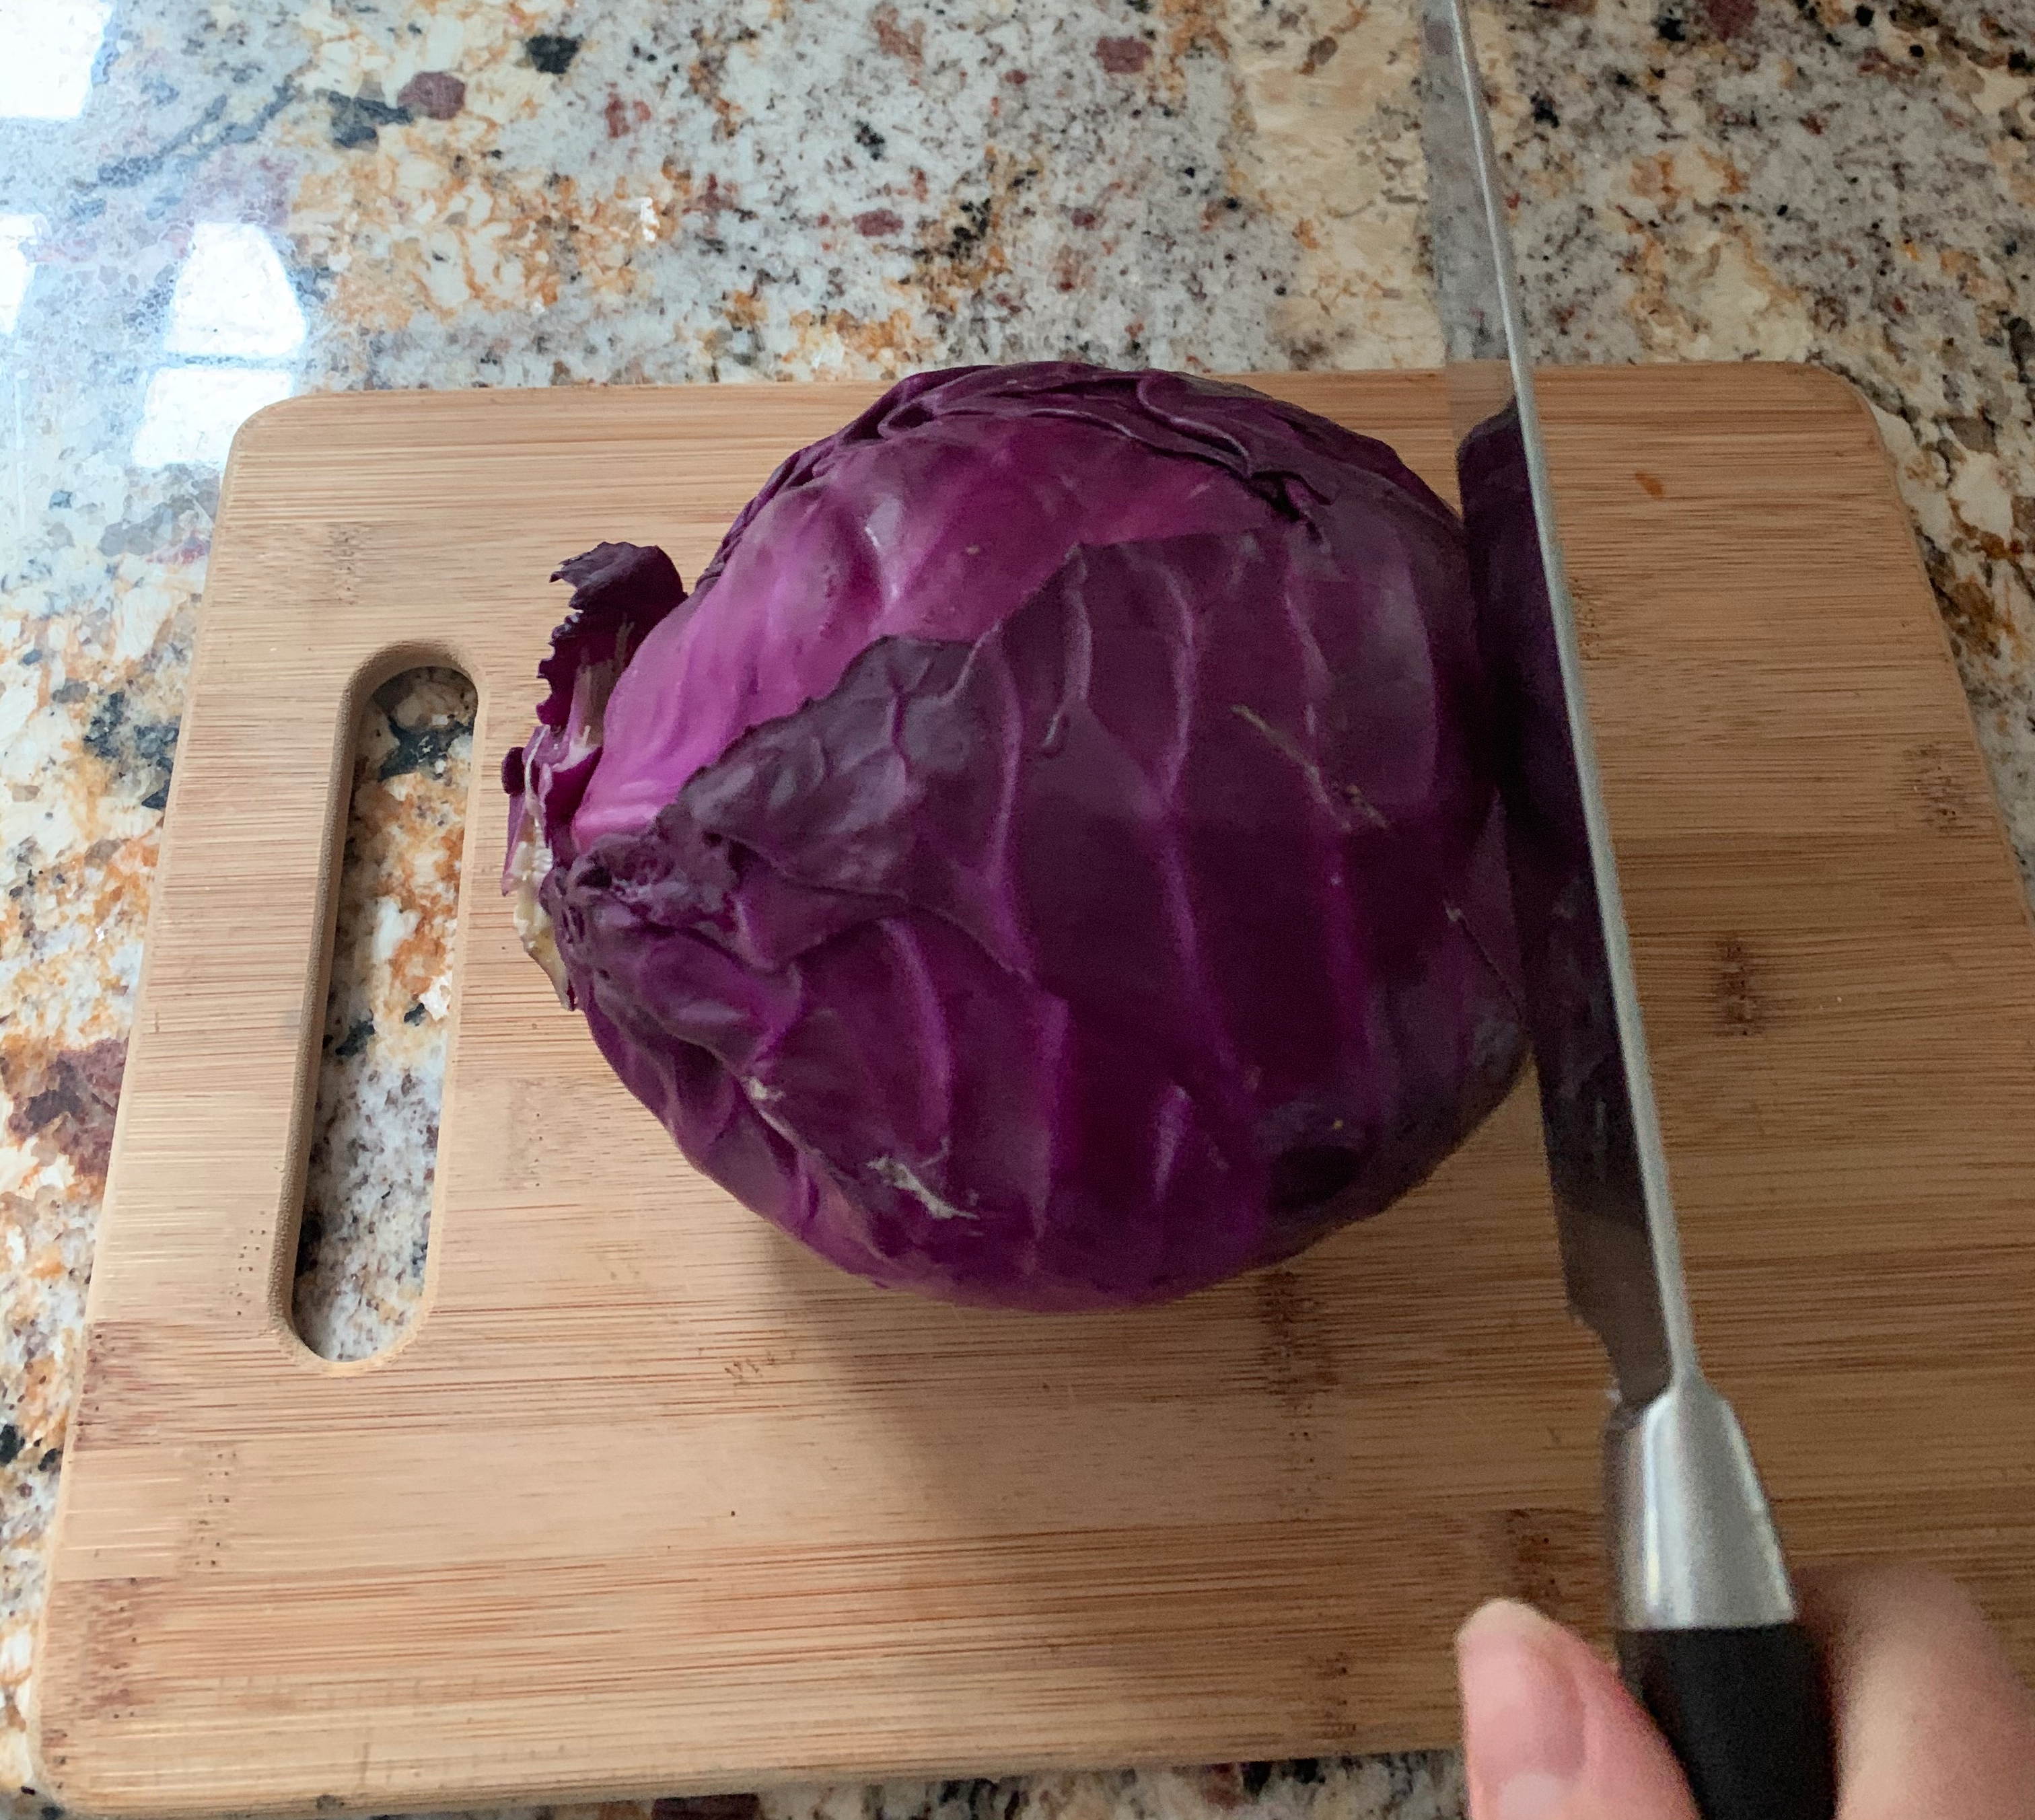
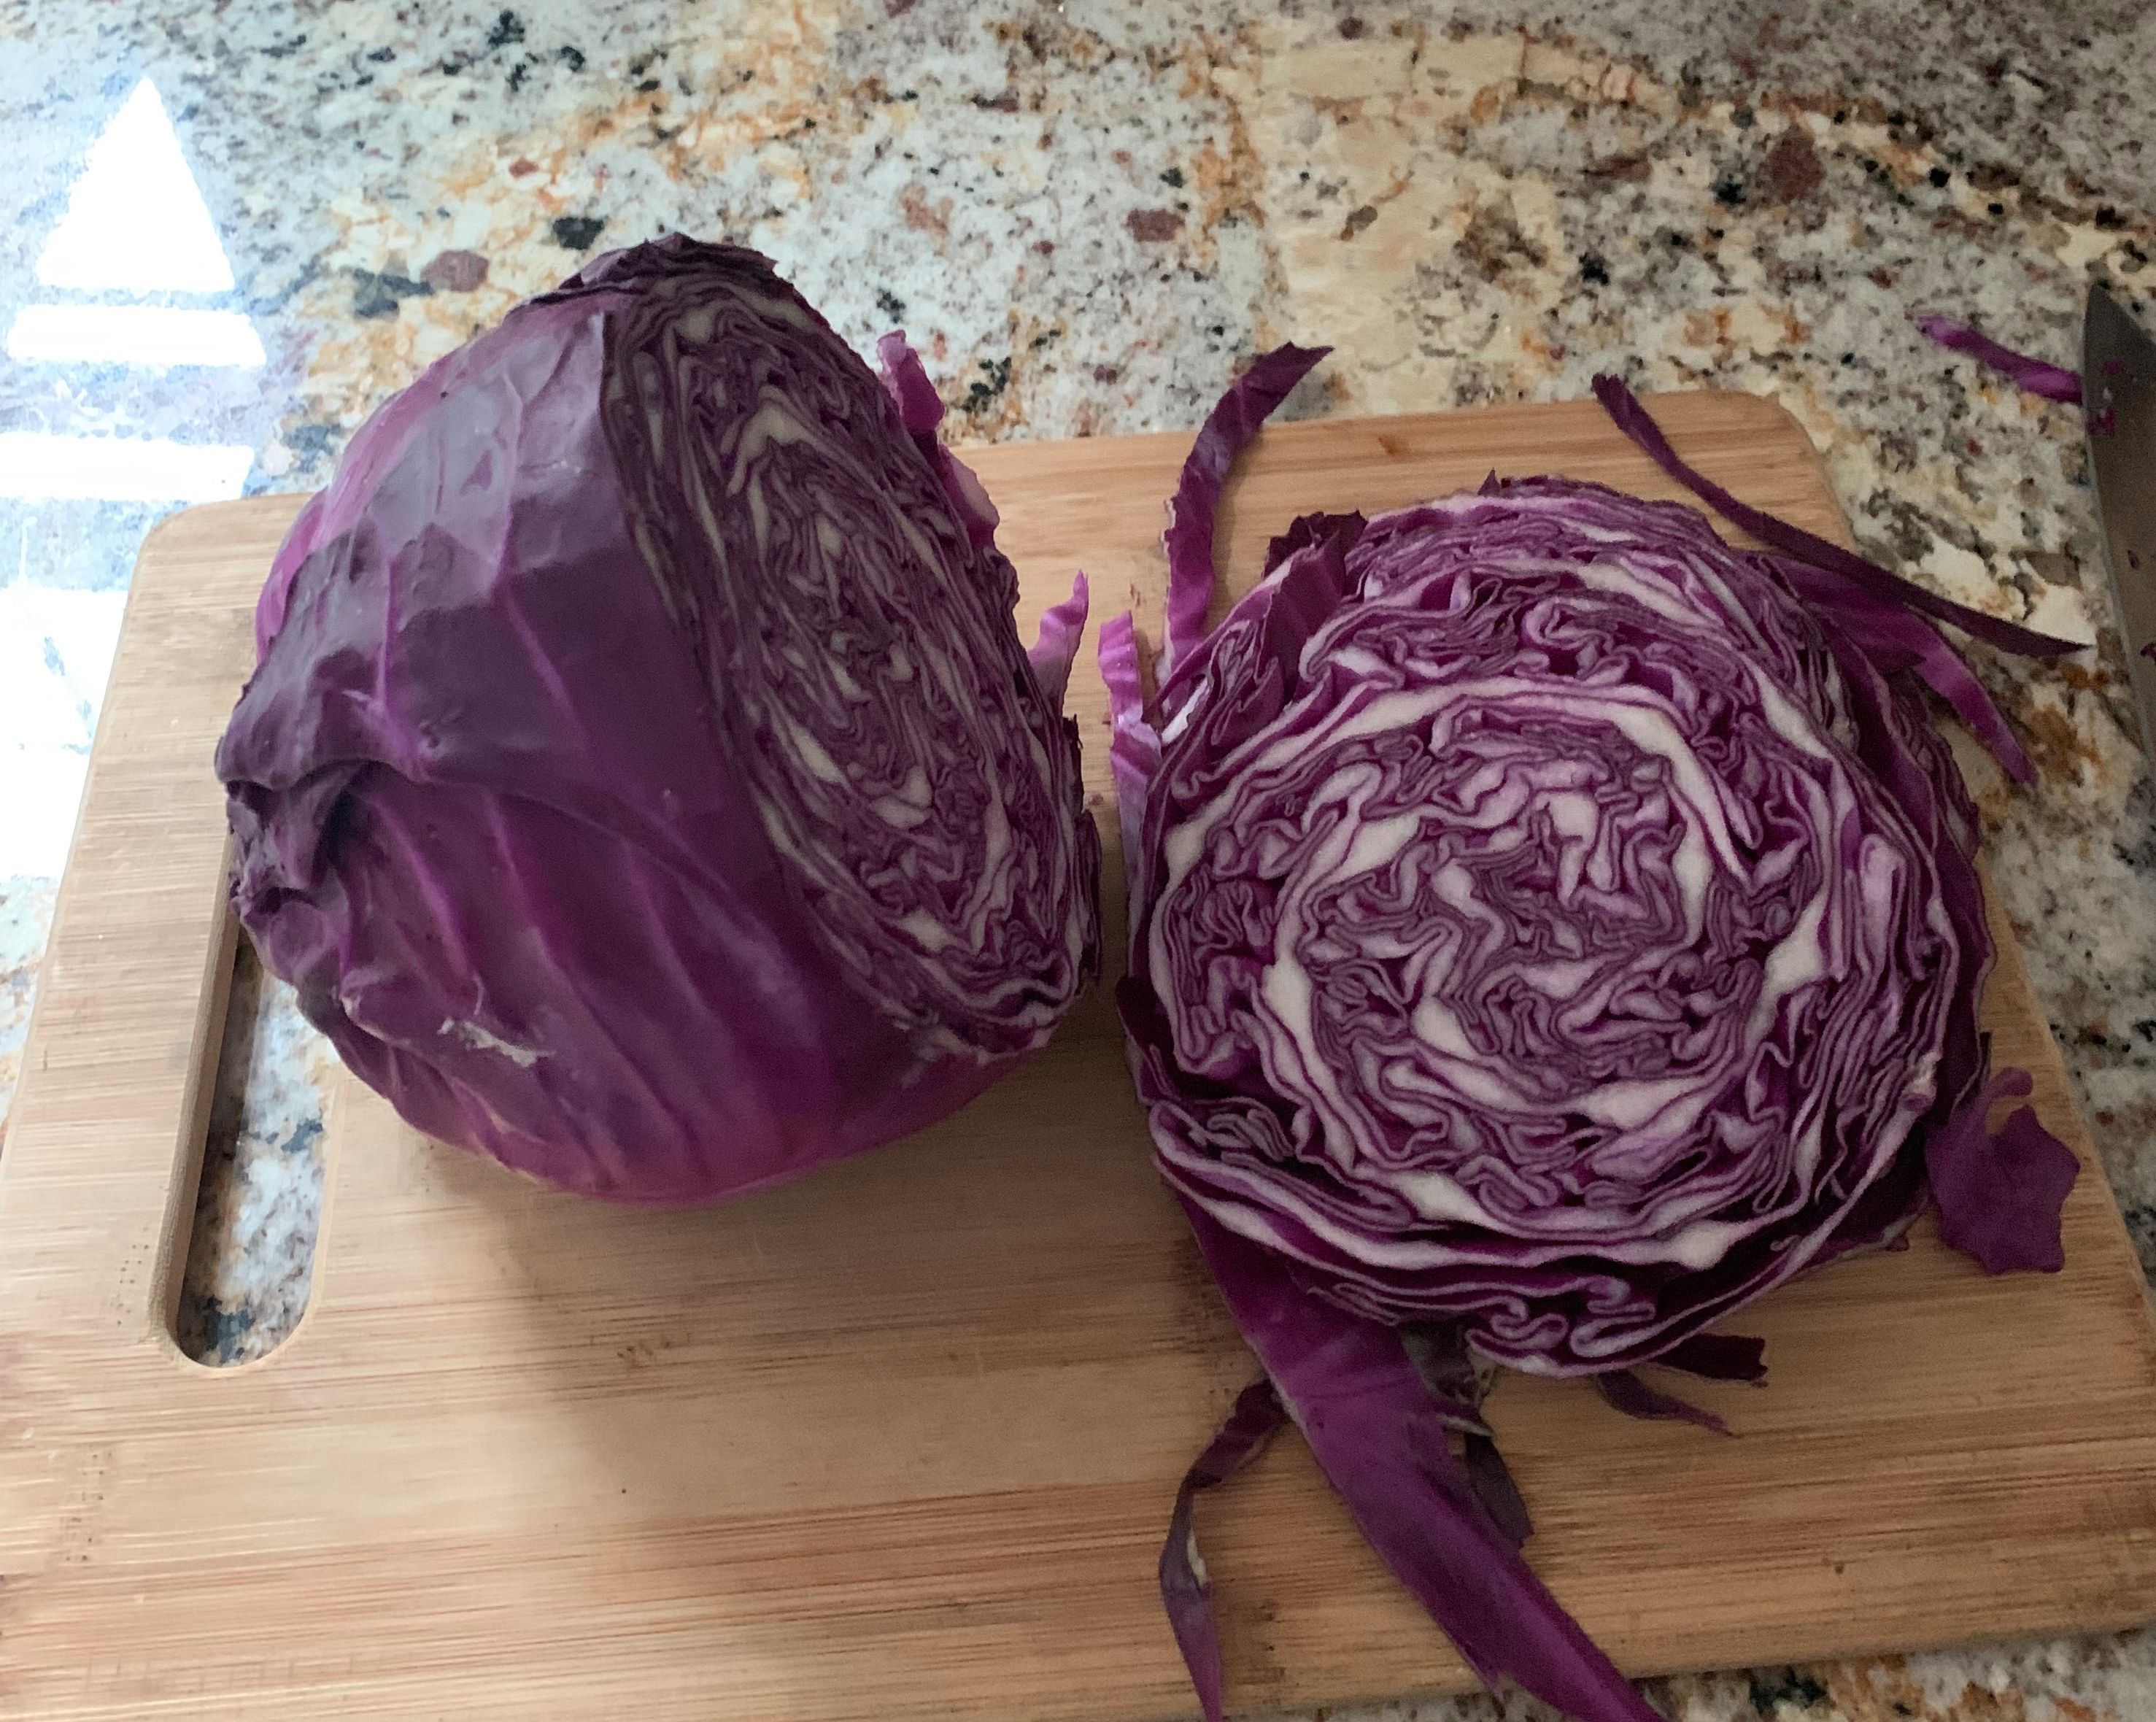
Set oven temp to 400. Take head of cabbage and slice it like you would bread. Hopefully the picture above explains that better. You want it to be pretty thin, like 1/8 of an inch. The thinner it is the quicker it will cook up so if you cut it too thick you will need to increase cooking time. Next you will lay the pieces flat on a baking sheet and generously salt it up and drizzle all the pieces with olive oil. Bake for 20-25 minutes. You want it to be really tender but not burnt, so depending on thickness 20 minutes is usually good enough.
*I typically only chop up half the cabbage at a time since its just for two of us but if you are cooking for more than two people or want more for later go ahead and chop up the whole head.