Low Carb Pizza

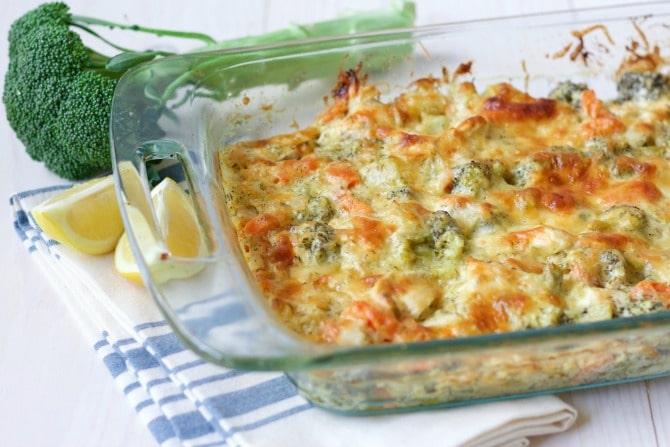
I am such a pizza lover. I could eat it every day of the week and not be mad about it. My kids love it too, my husband, my dog. When I cut down on grains in my day to day diet I couldn’t imagine cutting out pizza. The horror! Occasionally I do still make a regular pizza dough recipe that uses flour that is so freaking good but I think this recipe is equally as delicious :). The reason I cut grains from my typical diet was the same reason I had for cutting sugar. Trying to eliminate my headaches I’ve dealt with for so long and just a desire to want to feel better overall. Refined grains have little nutritional value and most of the grains we consume are a big cause of inflammation. We can stick to sprouted grains or fermented grains but those take time and are expensive so sometimes just eliminating is the easiest thing to do. One thing I have not been able to eliminate, and I can’t see myself ever doing so, is DAIRY! I just love cheese sososososososososo much. Probably 90% of my recipes will call for cheese, as does this one. You can go crazy on the toppings! Prosciutto, pear, zucchini, spinach, pineapple. Whatever your little heart desires. I will also share my pizza sauce as an added bonus!
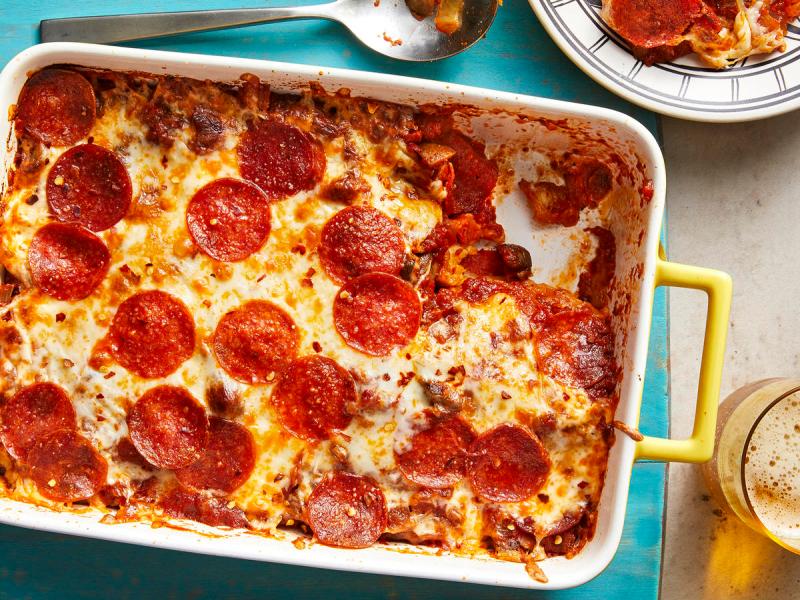
Low carb pizza

  • 3/4 cup almond flour
  • 1 and 3/4 cup mozzarella cheese
  • 2 Tablespoons cream cheese
  • 1 egg
  • pinch of salt
  • pizza sauce
  • toppings

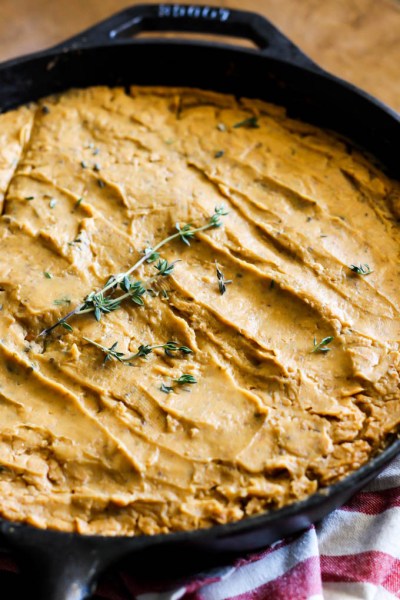
Put oven on 425. Combine almond flour, mozzarella cheese and cream cheese. Microwave for one minute. Stir well than microwave for another 30 seconds. Mix in egg and salt. Put a little olive oil or butter onto your hands and roll into a ball than set a side. Grease a casserole dish with butter or oil and press the dough down covering the bottom and pressing out into the sides. Next put into the oven for 12-14 minutes. After dough is cooked you can add on your pizza sauce (you can use my fab one below or any will do) and top with your desired toppings. We typically do browned ground beef, pepperoni and cheese. YUM!!!! Put back into the oven for an additional 12-15 minutes on 425.

Christine’s fabulous pizza sauce:

  • 2 cans diced tomatoes
  • 2 cans tomato puree
  • 1 can tomato paste
  • spices
  • carrot
  • 1/4 red onion
  • red wine
  • olive oil
  • baking soda

I always puree my diced tomatoes. I HATE tomato chunks in my sauce. Why don’t I just use 4 cans of tomato puree than? The answer is I have no idea, it’s just different ok!! So puree it or not, whatevs. Coat whatever pot you are going to use with maybe 2-3 tablespoons of olive oil and heat it up. Dice up your carrot and onion and add to the oil and saute for a few minutes until becoming fragrant. Next add in about 1/2 cup red wine. Dry red wine is probably what I usually use but just use whatever red wine you may have around. Let that simmer for a few minutes than add in two cans of diced tomatoes and 2 cans of tomato puree. Next I add in a tablespoon each of the following spices, oregano, basil, rosemary, garlic powder. Dash of salt. MAYBE some crushed red pepper if you like a kick. Mix this all in well and let it cook on high a few minutes. Than but your burner on low and put a lid on it. Cook for 20 minutes. Next open your can of tomato paste and add in 2 teaspoons of baking soda. This helps cuts the acid I was told before if you are prone to heartburn like my husband is. So once the 20 minutes is up, add in the tomato paste and baking soda and mix it into the rest. Cook another 20 minutes on low covered.

Flu Shot Oil Roller

I call this a flu shot oil roller but I don’t know if I like that name. Maybe Immune Booster? Maybe Flu Fighter? Hmmmm throw me some suggestions ;). I thought this was a fitting post since I’ve been reading about a fun little virus that is creeping over the entire WORLD and potentially effecting my TRAVEL plans!!! Not loving it. Not to make light of a potential pandemic but I also don’t love living in fear. Fear gets us nowhere… literally nowhere when entire cities are shutting down and messing with my potential travel plans! So lets be proactive and keep those hands washed people! I make some pretty fab hand soap which I’ll share another time. But today’s post is about this magical little oil roller I make. Mostly for my kids. But I use it too when I’m feeling not so great or know I’m going to be around a lot of people. I rub it behind my ears or on my wrists. It smells STRONG but I’m lucky and like the smell but others maybe not so much, so you can hide it under your feet. For my kids I roll it up and down their lower spine. I buy/sell doterra oils or I use some young living oils. I’m hearing there are some decent cheaper oil options out there but I trust the quality of young living and doterra so I recommend those. Just don’t buy some weird random oils from the target dollar section. Like who knows whats in those, yikes. Ok here it is! Kung Fu Fighting Immune Boosting Flu Shot Oil Roller!

Flu Shot Oil Roller:

  • 10 drops frankincense essential oil
  • 15 drops Lemon essential oil
  • 10 drops oregano essential oil
  • 10 drops on guard essential oil blend or thieves essential oil blend
  • 10 drops melaleuca essential oil

Add drops to 10 ml glass roller bottle and fill to the top with a carrier oil, I typically just use olive oil but fractionated coconut oil is what is recommended. Put a roller on top and give it a little swirl and its good to go! Like I said above you can put on feet or back of ears, wrists for adults. For my kids I just put a few rolls down their lower spine. If they get strep I will put it directly on their neck. For my kids I usually do this every school day for the flu season!

Nourishing Chocolate Chip Cookies!

Since having my kids I haven’t been the kind of person that snacks or grazes much. Mostly because once I start snacking I can’t stop! Also, because I’m too busy getting constant snacks for my kids. So usually I have set meal times that I more or less stick to but when I just need a little something extra these cookies are so awesome to have around. I HAVE to eat them warm. I don’t know why but it is the key to their goodness. So either straight out of the oven or heated up for a few seconds and they are just heaven! I’ve been making them for ages. My kids and my husband LOVE them and I will never tell them what is in them because they probably wouldn’t eat them again, ha! I have loads of “healthy” cookie recipes but nothing compares to the taste and simplicity of these. I have a few variations but the base recipe only calls for 4 ingredients. One of them being garbanzo beans/chickpeas (why do they have two names? weird) which are so crazy healthy!! Chickpeas boost digestion, help stabilize blood sugar levels, protect against heart disease and a lot more. Try these cookies and love them!!! P.S. you can eat this dough raw if you feel inclined to do so πŸ˜‰

  • 1 can chickpeas, drained
  • 1/2 cup almond butter
  • 1/2 cup dark chocolate chips or dark chocolate chunks
  • 1/4 cup maple syrup
  • sea salt (optional)
  • vanilla (optional
  • raw walnuts (optional)

Drain your can of chickpeas and pour into a food processor, add almond butter and maple syrup. Blend well. Next add chocolate chips or chunks and mix in well with spoon. Grease a cookie sheet and place golf ball sized balls spaced an inch a part. Cook at 350 for 8 minutes. These will keep there form when they bake, they don’t flatten out at all. Most of the time I add sea salt and vanilla but its not necessary. Also adding raw walnuts after blending makes them super yum. Make sure to eat them warm and enjoy!!

Healthy Banana Cream Pie

Have I mentioned how much I love desert??? I used to want it all the time!! But about 5 years ago I gave up refined sugar (aside from the occasional cheat) so it can be tough finding a desert to fit my “diet”. I gave up refined sugar to work on my issue with ongoing headaches/migraines. I can’t remember exactly when I started getting headaches but at LEAST since I was 9. They were/are SO painful. I finally did some digging into the root cause when they started becoming more and more frequent and a lot of what I was reading was pointing to the inflammation caused by my sugar intake. Since the big change in what I eat I have cut them down from weekly (sometimes daily) to only once a month, if even that, and it has been pretty life changing. I also have cut down on grains immensely but sugar for me is the real headache trigger. That said I DO still use honey and pure maple syrup occasionally but I will not use any artificial sweetener or anything I can’t pronounce. I have a whole arsenal of healthy deserts now and honestly I don’t really even like the taste of things sweetened with refined or white sugar anymore. Here is one of my favorites and I hope you all try it!! #glutenfree #dairyfree #Vegan

Frozen Banana Cream Pie

  • 6 ripe bananas – peel, cut in quarters, and freeze (it will take 6-8 hours to freeze fully)
  • 2 cups unroasted, unsalted almonds or walnuts
  • 1- 2 T maple syrup
  • sea salt
  • almond milk or other type of milk (optional)

Once your bananas are frozen bring them out onto the counter to let them thaw a little bit while your prepare the crust. You will need a food processor or strong blender for the crust. Put your almonds or walnuts ( I think I prefer walnuts but either would do fine) and add about a tablespoon or two of pure maple syrup, drizzling finely to cover the nuts than sprinkle with a little sea salt. I think I usually end up using 2 tablespoons of maple syrup but less is more, don’t overdo it. Blend it all up until it is combined really well… but don’t do it too long or you will have almond/walnut butter! It should be able to form a ball at this point. Place this mix into a pie dish and press it down evenly coming up the sides a little bit. Now For your bananas! I usually use the same food processor I used for my crust without washing it so a little of the nuts get mixed in with the banana. Start with six banana pieces. If they are a little thawed already they should blend up well but if they don’t add a little almond milk or other type of milk or even water to get it started. It will take a few minutes and should blend into a creamy texture. Very similar to soft serve ice cream. Put this batch into the pie crust and continue this same process with the rest of your bananas until all are blended up nice and smooth. You can cover your pie with some fresh bananas or other type of fruit or homemade whipped cream or chopped nuts, coconut, drizzle with dark chocolate, lots of ways to do it up! Or just serve it plain. I prefer to eat it right away when its smooth and creamy but some prefer to pop it in the freezer for a bit more like a hard ice cream. It will store fine for a few days in the freezer.

Flu Shot in a Glass

I have so many friends and family sick right now! Not to mention all the “there’s a lot going around right now…” comments. It can make you feel so unsettled! One minute I’m feeling safe and secure knowing my kids and I are well nourished, with strong immune systems etc and the next I’m in panic mode reminding my kids to not touch ANYTHING & debating on putting face masks on us all! Not really on that last part but it is SO tempting when we are traveling. I DID however use a travel tip on our last plane ride from Duchess Megan Markle herself! She wrote on her former blog that she uses a cotton swab to line the inside of her nostrils with a little neosporin. From her blog…β€œNot only does it create a barrier for germs, it also lubricates the skin in the nose,” she continued. β€œThat’s important because when the skin cracks, germs can come a running in, so the coating of the Neosporin doubly protects you.” I had been wanting to try this for ages but always forgot the neosporin but I remembered for this last trip so I lubed us all up! I can’t say for sure it actually helped any of us but I absolutely felt more at peace so I call it a WIN! Now, for the topic of the day! I make this juice drink any time any of us get sick but also would do me well to make it every week to boost our immune systems. It has lemon and garlic and pineapple!!! the garlic gives it an interesting kick but I actually LOVE how it all tastes together and garlic is a powerhouse for the immune system.

Flu Shot in a Glass:

  • Juice of six fresh lemons
  • 1 bulb garlic, peeled and crushed
  • 1 inch fresh ginger crushed or 2 t ginger powder
  • 2 T honey
  • 3 cups pineapple juice (fresh is best)
  • 1/4 t cayenne powder
  • fresh mint leaves

If you have a juicer put your lemons and one fresh pineapple through. If not juice the lemons by hand and use canned pineapple juice. Peel all the garlic cloves and mince or crush it along with the 1 inch piece of ginger root if using or just add the powder to the juice. Put juices and garlic and ginger into blender and add honey (local and raw is best!) and cayenne. You can add the mint leaves now or add the whole leaves to your cup before you drink. Blend it all up until everything is well blended and store in a glass jar or pitcher. If you are sick drink one cup every four hours for two days. If you are using for immune boost one cup a day is great.

Sweet Potato Shepherd’s Pie

This is another recipe I make weekly, I personally get really excited about it but my husband can’t get over his hatred for brussel sprouts… (which is sad for him because they are the BEST!) but even though its not his fave he still eats it up! I was just realizing I’m not sure if I’ve ever even had an authentic shepherds pie so I can’t say how similar this recipe is to the original. Maybe I should change the name, ha! It is full of good nutrition and so yummy!! Hope to have some of you try it :)! Grain free and dairy free!

Recipe:

  • 8 brussel sprouts chopped
  • bunch of asparagus chopped into 1/2 inch pieces
  • 2 parsnips peeled and chopped
  • 1 sweet potato chopped
  • olive oil
  • sea salt
  • ground beef, browned
  • 1 can full fat coconut milk
  • 1 can organic sweet potato puree (or butternut squash)

Take all of your chopped vegetables and toss them in olive oil and sea salt than roast for 25 minutes at 425. Once you can pierce vegetables easily with a fork place them at the bottom of a casserole dish. Top with browned ground beef. In a medium mixing bowl empty can of sweet potato puree. Give the can of coconut milk a very hard shaking to combine the liquid with fat, you should feel it moving in the can once it starts combining. Mix the sweet potato puree with the coconut milk until thoroughly combined than spoon over the ground beef fully covering. Bake for 20 minutes at 400. Serve with sea salt and a smile!

#dairyfree #grainfree

Chicken Broccoli Casserole

This is an absolute favorite of mine. It is SO rich and creamy and absolutely free from grains but you don’t miss it a bit! It is best if made with my bone broth recipe I posted last month but really any store bought or homemade broth will work. My husband is always so pouty about a lot of my “go-to” recipes… “we are having that again?” Even though everything I make is fabulous I dare-say ;)! But when he hears I’m making this he always lights up and that makes me happy. I found a variation of this recipe years ago in a fancy salon waiting to have my hair colored but the recipe has changed so many times since than I think the only ingredients that remain are the chicken and the broccoli! Ok, onto the recipe!

Chicken and Broccoli Casserole with Bone Broth

  • whole roasted chicken (cooked and deboned) or two chicken breasts
  • 4 T butter
  • 2 cups Bone broth (or any store bought or homemade broth
  • 1/4 cup coconut flour or 1/2 cup almond flour
  • 3 cups shredded paremesan
  • juice of one lemon
  • 1 cup greek yogurt or sour cream
  • broccoli
  • pinch nutmeg and salt and pepper

I typically use a whole roasted chicken and after cooking and deboning I use just one or sometimes two breasts for this, reserving the rest of the meat for a separate dinner or my dog, ha! Or you can just buy and prepare two chicken breast and dice or shred than set aside. Next you will get out your skillet, preferably cast iron and melt your butter. Mix in coconut flour or almond flour (sometimes I use a mix of both). It should get kind of foamy at this point and start thickening up. Now you will add in the bone broth and cook until it starts to bubble a bit, over medium heat. Juice your lemon, making sure to keep the seeds out and stir in to the sauce followed by the sour cream or full fat greek yogurt. Now you will add in two cups of shredded parmesan and stir well until melted. For the broccoli, I usually roast my broccoli ahead of time, if you don’t roast before baking, it will not cook up very well. I dice it up (including the stalks) and drizzle some olive oil and sea salt throughout than bake at 400 for 20-25 minutes. When this is done mix in with the rest and add the chicken. Add in a pinch of nutmeg, salt and pepper and continue cooking and stirring until it is all incorporated well. Transfer to a casserole dish and top with remaining parmesan cheese and bake for 20 minutes at 350. Hope you love this as much as I do!

Bone Broth!!!!!

Oh my, its been a super long time since my last post! Summer was such a whirlwind and I was enjoying every second with my little’s before school started again in the blink of an eye. So, pretty much all my projects were on the back burner, but… they are back in school now and I’m looking at some time for myself again! My list is pretty extensive, repainting cabinets, home organization, etc., but always at the top of my list is finding ways to keep my family healthy and well nourished. Which brings me to the topic of the day, BONE BROTH! Never in a million years when I was younger did I picture myself buying bones and cooking with them let alone drinking broth on its own. But… I’ve come along way, ha! So… bone broth is legit. It’s like liquid gold, well the OTHER liquid gold (hello breast milk!). Bone broth is a mineral rich concoction made from boiling bones from healthy animals with other vegetables, herbs and spices. It is known to boost the immune system, support digestive health and is even anti-aging and good for nails and hair do to all of the collagen from the bones. Speaking of collagen, this will also contribute to joint health so this is a great benefit for anyone with back or knee problems, arthritis etc. It is naturally high in phosphorous, magnesium and calcium benefiting bones and teeth! The list of benefits is pretty extensive but I’ll stop there…now onto my recipe! I do mine in a slow cooker but a dutch oven also works great. You can purchase bones at a farmers market or usually a health food store, or find a local farmer. I roast my bones first because it improves the flavor and don’t forget the apple cider vinegar or it won’t gel!

Slow Cooker Beef Bone Broth:

  • Two lbs beef bones from a good source
  • one onion
  • 3 carrots
  • 3 celery stalks
  • garlic bulb
  • 2 T apple cider vinegar
  • bay leaf
  • any herbs or spices you want to add (peppercorns, salt, parsley, rosemary)
  • water

With oven at 400, place bones on a baking sheet and roast for 30 minutes on one side, flip than 30 minutes on the other side. Remove bones and place at the bottom of your slow cooker. Coarsely chop your vegetables and garlic, keeping skin on all of it and spread around the bones. Add in your apple cider vinegar than add enough water to cover everything. I cook for 24 hours but anywhere from 18-36 hours is good. You want your broth to gel after it cools but it will not do so if you do not use quality bones or apple cider vinegar, but if it doesn’t gel don’t toss it! It will still be packed full of nutrition :). I drink my bone broth like a tea or cook with it. My favorite two recipes are italian beef and chicken broccoli casserole, but those will be shared another day ;). Also! save your fat from the bones! I use it to make lotion… also a recipe for another day!

Yummy (and Healthy!) Grain Free Banana Muffins!

I’m always trying to find snacks for my kids that aren’t super overly processed and filled with ingredients I can’t pronounce. Not to mention, not LOADED with sugar. My two little’s are absolute snack monsters. I will sit there for 45 minutes trying to get them to finish their breakfast/lunch/dinner but as soon as they are up…its mom can I have a SNACK??? grrrrrr! So Its so great to have snacks that are filling and nutritious on hand so it doesn’t matter so much that they NEVER want to eat an actual meal. Of course apples, bananas, nuts, seeds, yogurt are great and come in really handy but its fun for them to make it feel like a ‘treat’ and not just the same boring thing every-time. This is where these super yum banana muffins come in. I kind of make these different every time, depending on what I have on hand. It is necessary that the bananas either be super ripe or frozen bananas thawed. I usually use two ripe bananas, eggs, coconut flour, baking soda, vanilla, butter or coconut oil and sometimes if I want to get really crazy I will use a little bit of pure maple syrup. You really don’t need any sweetener at all because the bananas are already so sweet but the maple syrup does give it a nice nutty flavor and the kids like them more when I add it ;). Have you seen how much fiber is in coconut flour?! A little goes a long way, I use 1/4 cup coconut flour where you would normally use 1 cup of wheat flour. We are more or less grain free in our house. For lots of reasons but I’m not super strict about it, especially with the kids because I want them to be able to eat fun birthday cake at parties etc. But for cooking at home I always use coconut flour or almond flour. So anyway there is lots you could add to these, walnuts, raisins, brown sugar, honey, blueberries. You could also leave the maple syrup or honey out of the recipe but than drizzle a little on top when you eat them :). This can also be a bread recipe too! Just put in a bread dish and change the time to 30-45 minutes or so. But here is my typical banana muffin recipe, enjoy!!:

Grain Free Banana Muffins:

  • 5 eggs
  • 2 ripe bananas (or 2 frozen bananas thawed)
  • 1/4 cup butter or coconut oil
  • 1/2 cup coconut flour
  • 1 tsp pure vanilla extract
  • 1 tsp baking soda
  • 2 Tablespoon maple syrup

preheat oven to 400 ℉. I use a silicone muffin pan but if you have a metal one grease it up! Put all ingredients in a bowl and mash/mix it all up. Batter should be thick but if its too thick add a little almond milk or milk. Fill up your muffin cups and bake for 14 -16 minutes.

Energy Balls!

Have you tried an energy ball yet? I love them so much! They are so full of….everything! They are nutritious, delicious, convenient, and the options as far as ingredients are basically endless. I may go as far as saying it is the perfect snack. I have been experimenting a lot with these lately, toying around with the idea of potentially setting up a cute little stand at the local farmers market and selling a few varieties of these little guys and a few other fun things. My latest creation was O-M-G good! The fact that you can even call these little guys ‘healthy’ seems to good to be true but they ARE! They are healthy, provide energy, so satisfying and so over the top yummy! Since cutting refined sugar from my diet and avoiding foods with added sugar I don’t appreciate sweet foods like I once did so my recipe here is a little on the not-so-sweet side. You can experiment by adding a little extra honey or even scaling back more than I did. It really is strange. the more you move away from the sweet stuff the more you can taste how overly sweet a LOT of the food is in our day to day diet. I can barely eat a cookie anymore or a brownie or any of the fun stuff I used to eat all the time! Anyway, I hope you enjoy these as much as I do :):

Baklava bites

Ingredients:

  • 1 cup raw walnuts
  • 1 cup dry roasted and salted pistachios
  • 1 T cinnamon
  • 2 T coconut oil
  • 2 T raw honey
  • 1 cup all natural peanut butter (homemade preferably)
  • 1 t vanilla

Place all ingredients in a food processor. I used the ninja master prep but I think it would work better and faster in a legit food processor (which I also have but I’m lazy about cleaning it, ha!) Grab out a scoop around the size of a heaping tablespoon and roll it up to form a good little ball. You can go bigger or smaller according to what you are looking for. This size (about like a big gumball) will make about 10 balls give or take a few. At this point you can roll them in crushed pistachios or coconut flakes or something along those lines or you can leave them bare like I did. Once you have them in perfect little balls (they will be sticky unless you rolled them in something) place them in an airtight container and refrigerate until they harden up a bit. Voila! you have an energy ball! I would say these should store just fine in the fridge for about a week or if you need to keep at room temperature a few days should be fine. I dare say your kids may even like these too!